This Root Beer Float Cookie Cups recipe is perfect for summer! Make them with root beer buttercream frosting or with real ice cream and root beer for a fun dessert.

It isn’t summer until you’ve got root beer floats, right? Or maybe you are like my family, and you enjoy floats year-round.
Either way, it’s time for a summer version of my hot chocolate cookie cups: Root Beer Float Cookie Cups. Today, I am going to share two different ways to serve these cookie cups: one with frosting and one with ice cream and root beer.
In This Post
How To Make Root Beer Float Cookie Cups

Spray a mini muffin pan with cooking spray. I love to use a silicone mini muffin pan for best results. Add a tablespoon of sugar cookie dough to each cup.
To make this really easy, I used Pillsbury Ready-To-Bake Sugar Cookie dough, but you can use homemade sugar cookie dough if you prefer.

Bake at 350˚F for 20-25 minutes. I baked my first batch for 20 minutes, and they were soft and very light in color. I baked the second batch for 25 minutes, and they were harder and more of a golden color.

Allow the cookie cups to cool, and they will easily slide out of the pan.

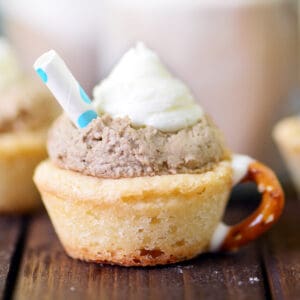
Break or cut the upper loops off of mini pretzels to use as handles.

Melt vanilla almond bark and attach a handle to the side of each cookie cup. Hold them in place for several seconds to ensure that they stay put. Set the cookie cup with the handle upwards in the mini muffin pan to harden.

Put a scoop of root beer buttercream into each cookie cup. Use the back of the scoop to squish the buttercream (to make it look more like a foaming root beer float) and to make a small indent in the top.

Pipe vanilla buttercream into the small indent in root beer buttercream.

Add a small paper straw segment to each cookie cup.
Ice Cream and Root Beer Cookie Cups

Coat the inside of each cookie cup with melted vanilla almond bark.

When ready to serve, put a tiny scoop of vanilla ice cream, about one teaspoon, into each cup.

Pour in some root beer, add small segments of straws, and quickly enjoy before the cookies dissolve!
Frequently Asked Questions
Yes, they can be made ahead of time and stored in an airtight container in the fridge or the freezer.
Yes, you can use whichever you prefer. This recipe has never been tested with homemade cookie dough, so results may differ.
Greasing the pan helps, as does rolling the cookie dough balls in sugar. Using a silicone pan or a good, non-stick mini muffin pan is a great option.
Allow the cookie cups to cool completely. Then, use a thin, flexible knife to pry up the edges of the cookie cup and run the knife along the edge of the cookie cup.

More Cookie Cup Recipes
- The ORIGINAL Hot Chocolate Cookie Cups with mini marshmallows.
- Red Velvet Hot Chocolate Cookie Cups are perfect for Valentine’s Day!
- Flower Pot Cookie Cups have crushed Oreos for dirt.
- Easter Basket Cookie Cups are a fun Easter treat!
- Make 2 Ingredient Cookie Cups from Crazy For Crust with PB cups.
Root Beer Float Cookie Cups
Equipment
Ingredients
Cookie Cups
- 16 oz sugar cookie dough I used Pillsbury Ready-To-Bake sugar cookies
- 4 oz vanilla almond bark
- 12 pretzel twists
Root Beer Buttercream Frosting
- ½ cup butter, softened
- ½ cup vegetable shortening
- 4 cups powdered sugar
- 3 teaspoon root beer concentrate I used McCormick
- ½ cup marshmallow cream
- 1 tablespoon milk
Ice Cream and Root Beer Version
- 4 oz almond bark
- ½ cup vanilla ice cream
- 1 cup root beer
Instructions
Cookie Cups
- Preheat the oven to 350˚F. Coat the silicone mini muffin pan with cooking spray.
- Put one tablespoon of sugar cookie dough into each cookie cup. (This is one of the ready-to-bake segments.)
- Bake for 20-25 minutes.
- Allow the cookies to cool before removing from the pan.
- While the cookies are cooling, make the buttercream frosting recipe below.
- Break or cut the upper loops off of mini pretzels to use as handles.
- Melt vanilla almond bark and attach a handle to the side of each cookie cup, holding them in place for several seconds. Set them in the mini muffin pan to harden.
- Put a scoop of root beer buttercream frosting into each cookie cup and top with vanilla buttercream frosting.
Root Beer Buttercream Frosting
- Beat the butter and shortening until smooth and creamy.
- Slowly mix in the powdered sugar one cup at a time.
- Beat in the marshmallow cream, milk until light and fluffy.
- Remove 1/2 cup of buttercream frosting and set it aside.
- Stir the root beer concentrate into the remaining buttercream frosting.
Ice Cream and Root Beer Version
- Coat the inside of each cookie cup with melted vanilla almond bark.
- When ready to serve, put a tiny scoop of vanilla ice cream, about one teaspoon, into each cup.
- Pour in some root beer and serve immediately.

Katherine says
These are so cute!!
Connie | URBAN BAKES says
OMG these are super cute!! Love the video too!
Jocelyn (Grandbaby cakes) says
Just when I think you can’t get any more creative, you come up with this! Amazing!
Andi @ The Weary Chef says
I’m so impressed with all the time you put into this recipe and the tutorial. These are beyond cute, Tonia!!
Patricia @ Grab a Plate says
So creative! So adorable! This is all around fun!
Sara says
These are pretty much the cutest cookies I’ve ever seen, what a creative idea!
Beth says
I can already see these root beer floats popping up at parties everywhere this summer!
Erin @ The Spiffy Cookie says
What little cuties!
Becky | The Cookie Rookie says
OMG. These are BEYOND!!!! Obsessed!
Kacey @ The Cookie Writer says
How cute are these?!! A perfect birthday dessert, and much easier than A LOT of the desserts I make 🙂
Jessica @ A Kitchen Addiction says
What a fun idea! A perfect summer dessert!
Julianne @ Beyond Frosting says
Gosh I love the idea of filling these with ice cream and root beer!!!