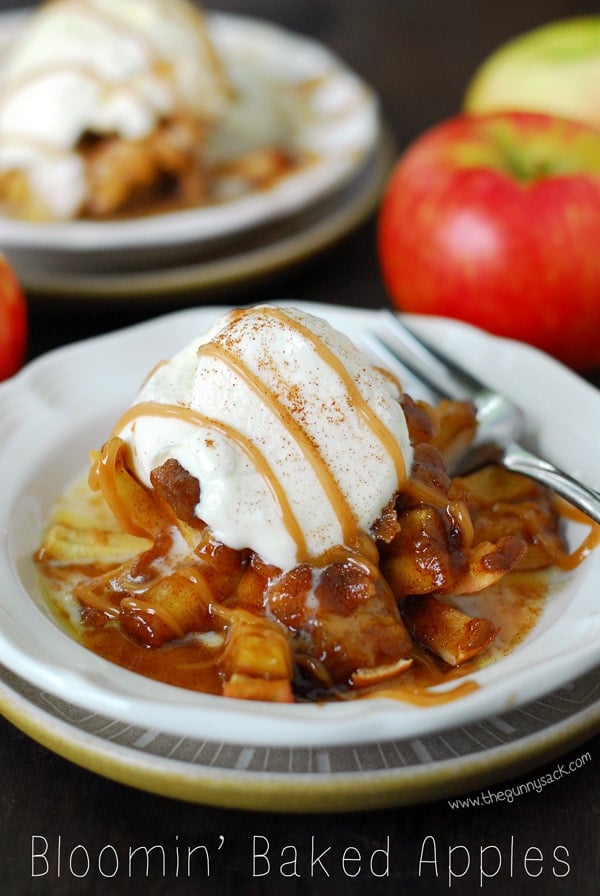
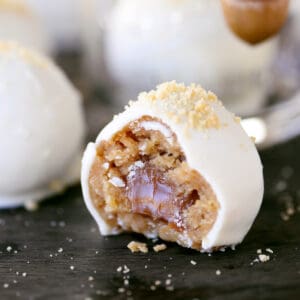
Bloomin’ Baked Apples taste like apple pie with an ooey, gooey caramel center! This is an easy dessert recipe for fall and it’s made with Honeycrisp apples.
Every year we wait for the fall and apple season to come around! Growing up, we had an apple tree in our backyard. I remember my grandmother coming over to help my mom freeze apples. We had an apple peeler/corer that was a big help. My mom froze the apples for pie filling.
All winter long we would have delicious, homemade apple desserts. This year, we are already enjoying the apple season. I used some of our apples to make these delicious Bloomin’ Baked Apples. This was my first time making baked apples and I am so excited not only about how tasty they were but also about how easy they were to make.
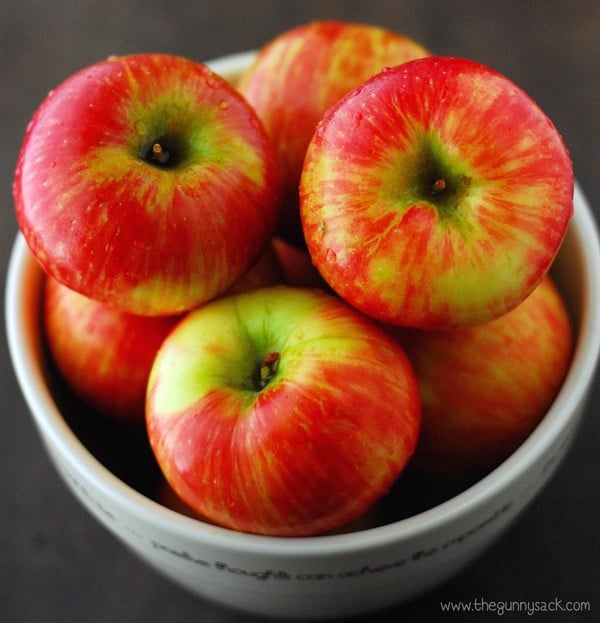
Our favorite apples are Honeycrisp apples which were developed right here at the University of Minnesota!
How To Cut The Apples
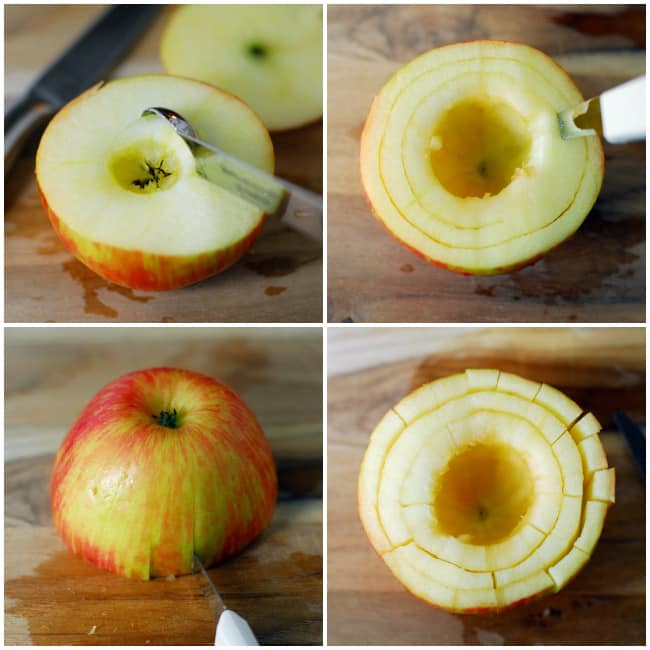
To get the blooming apple look, you need to cut the apples. Slice off the top 1/4 to 1/3 of the apples. Scoop out the core with a melon baller or a stainless steel measuring spoon.
Then, use a thin paring knife to make two deep, circular cuts around the center of the apple. Next, turn the apple over and make narrow cuts all the way around the apple. Flip it back over and you can see all of the cuts.
How To Make
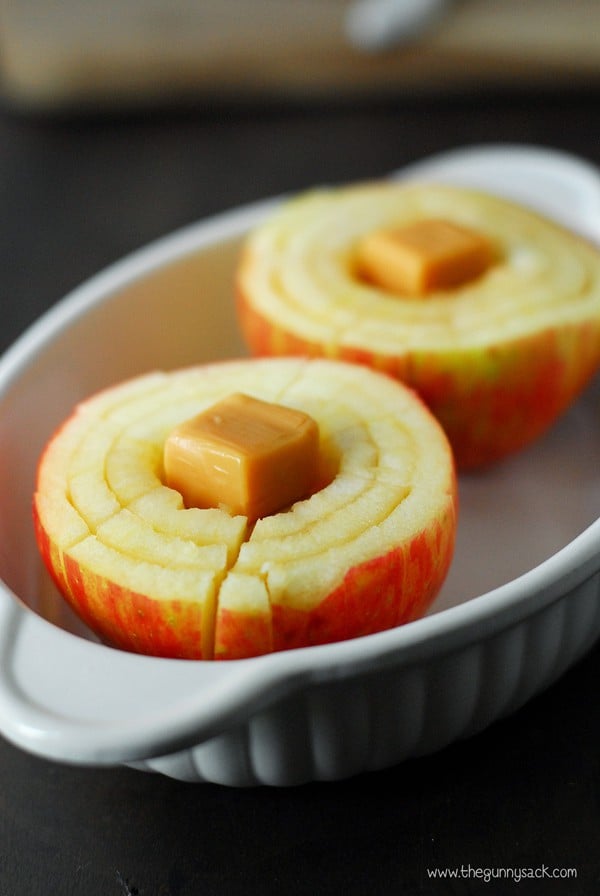
Place the apples in a small oven-safe dish and put two chewy caramels in the center of each apple.

Heat butter and brown sugar in the microwave for 30 seconds, stir and continue heating for an additional 30 seconds. Remove from the microwave and stir in flour and cinnamon. Divide the mixture over the top of the two sliced apples.
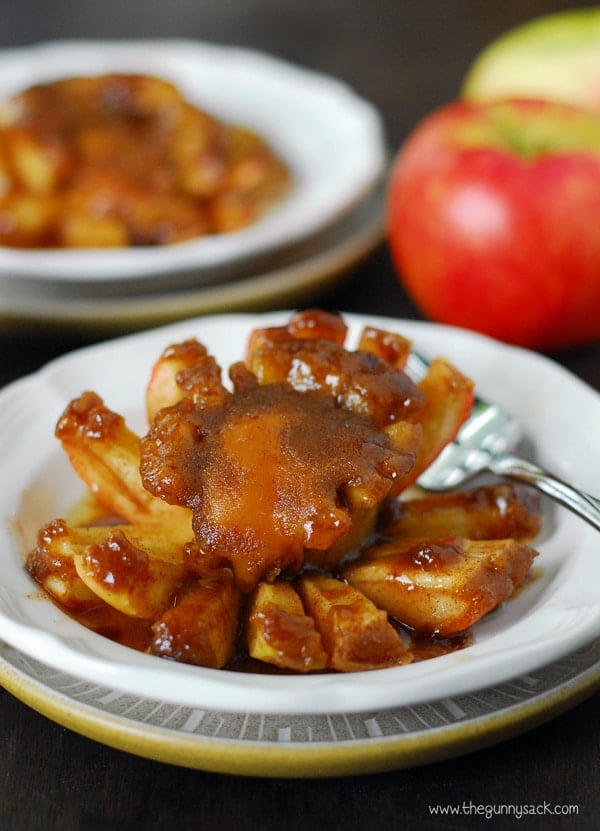
Bake at 375˚F for 25-30 minutes. Remove from the oven and use a large spoon to move the apples into bowls. The outside layer of apple pieces will spread out and the middle will stick together due to the ooey, gooey caramel center!
**Update…I made myself another bloomin’ baked apple last night and I had to cook it for 45 minutes. I would suggest that you check your apples after 25 minutes and then continue cooking them until they are tender. The cook time will depend on the size and firmness of the apples.**
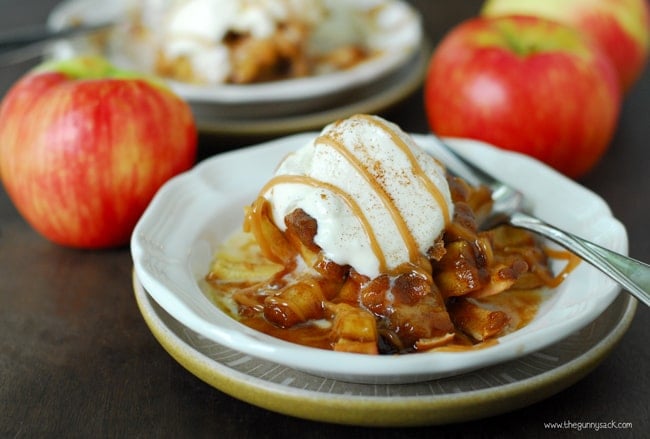
Top with a scoop of ice cream, drizzle with caramel sauce and sprinkle with cinnamon. The ice cream will cause the caramel in the center to harden, so eat it quickly or put the ice cream scoop on the side. After taking the pictures, I immediately had to try these Bloomin’ Baked Apples.
Zack asked me what it tasted like because he could tell I was thoroughly enjoying it. I explained that it tastes like apple pie. He asked me if I meant for it to taste like apple pie and luckily that is just what I was going for! I’ve made these Bloomin’ Baked Apples three times now and they were delicious each time. My daughter and her friend loved them!
More Bloomin’ Recipes

Bloomin' Baked Apples Recipe
Video
Ingredients
- 2 Honeycrisp apples or other crisp apples
- 2 tablespoon butter
- 3 tablespoon brown sugar packed
- 1 tablespoon flour
- 1 teaspoon cinnamon
- 4 caramels
- Optional toppings: vanilla ice cream, caramel sauce, and cinnamon
Instructions
- Preheat the oven to 375 degrees.
- To get the blooming apple look, you need to cut the apples. Slice off the top 1/4 to 1/3 of the apples. Scoop out the core with a melon baller or stainless steel measuring spoon.
- Use a thin paring knife to make two, deep circular cuts around the center of the apple. Next, turn the apple over and make narrow cuts all the way around the apple. Flip it back over and you can see all of the cuts.
- Place the apples in an oven safe dish and put two caramels into the center of each apple.
- Heat butter and brown sugar in the microwave for 30 second, stir and continue heating for an additional 30 seconds. Remove from the microwave and stir in flour and cinnamon. Divide the mixture over the top of the two sliced apples.
- Bake at 375 for 25-30 minutes. (Check apples after 25 minutes and continue cooking until tender. Some apples can take 45 min to 1 hour to soften.)
- Remove from the oven and use a large spoon to move the apples into bowls.
- Top with a scoop of ice cream, drizzle with caramel and sprinkle with cinnamon. The ice cream will cause the caramel in the center to harden so eat quickly or put the ice cream scoop on the side.

Moronberg says
You could also serve it with graham crackers (or cracker pieces) or vanilla wafer cookie pieces, if you wanted a crunch or crust-like addition.
Kelle Banks says
Sounds so good can’t wait to taste, Thanks!
J-Lynn says
Thanks,Tonia for this easy recipe that tastes amazing! Next time I plan to use “caramel topping” and a few finely chopped walnuts or pecans for texture. This was my first time on the website and I was saddened to be so distracted by the petty, unkind attacks on a few people that asked honest questions. This is supposed to be a site to share recipes and learn new techniques. Honest questions are part of education folks. I hope this is not the way you speak to your children or other “face to face” when they ask honest question. The all-natural person did go overboard. But regarding GMO food here is a small snippet from a large scientific data base on the topic:
” Most GM crops are engineered to be “herbicide tolerant”―a deadly weed killer. Monsanto, for example, sells “Roundup-Ready” crops, designed to survive applications of their Roundup herbicide.
Between 1996 and 2008, US farmers sprayed an extra 383 million pounds of herbicide on GMOs. Overuse of Roundup results in “superweeds,” resistant to the herbicide. This is causing farmers to use even more toxic herbicides every year. Not only does this create environmental harm, GM foods contain higher residues of toxic herbicides. Roundup, for example, is linked with sterility, hormone disruption, birth defects, and cancer”.
My point, this does not even touch on the DNA altering effects of the GMO food itself. Since kids eat so many apples and apples are sprayed abundantly, AND children are small and they cannot tolerate large doses of medicines OR toxins, I would caution against using non-organic apples in recipes where the skins are eaten. Go check for yourselves–if you are on this site you can use the internet. Key in “GMO Food Dangers” and learn before you bully people online. Probably none of the “organic” comments would have appeared if Tonia hadn’t innocently suggested purchasing apples from Wal-mart. Be More Tolerant folks.
Best of Luck with your Award, Tonia!!!
JennI W. says
I planted my own apple trees as soon as I moved here and try to harvest as much as the squirrels don’t spoil. ALL ORGANIC ONLY!!! My pears do so beautifully that it’s not the squirrels so much as people passing by that cause them to disappear.. My pear trees are real show offs! I encourage every one that can to plant your own. There are varieties that dwarf and can fit in a small front yard. When I was in an apartment temporarily I built troughs and had at least garden space on my third floor patio.
Lizbeth Gomez says
Delicious!!
Sandy says
I would like to know if you can use Granny Smith apples instead of red ones? This would be a great recipe for Thanksgiving for those who have a hard time with pie crusts. I have never seen so many comments for a recipe, especially about caramel wrappers. Can’t they read? Very comical. Thank you.
LaToya says
your asking if someone can read but the recipe clearly says u can use any type of apple as long as its crispy!
julie says
Was it really necessary to make such a snarky comment? Spread love! Be kind, always! Make the world a better place with every action you do. 🙂
Tonia says
Yes, Granny Smith would be delicious in this recipe! Thanks Sandy!
Jennifer Whitenack says
This sounds soooo delicious! I am going to try it tomorrow with some granny smith apples. They are always wonderful apples for pies, so I hope they are for this as well! Thank you for the wonderful recipe.
Tonia says
You are very welcome! Let me know how they turn out with the Granny Smith apples!
Debbie Jones says
I may have to leave the brown sugar off the top for ( sweet reasons) but I definitely think I can handle a couple of caramels and Honey Crisp apples are my absolute favorite. thanks for posting the recipe.
Tonia says
Thanks Debbie! I agree about the Honeycrisp apples! Delicious!
Sharla says
Unbelievably fabulous ! Scrumptious and aromatic ! Perfecting the depth of cutting probably takes a couple of tries, but it was wonderful nonetheless ! Thanks so much … Definitely adding to our “favorites” dessert list ! Side note…. Love love LOVE the slightly firm texture of the apple, but if others like them softer, just bake a little longer 🙂
Judy says
It’s hard to see how long the cuts are on the outside of the apple and how deep they are? All they through all 3 layers?
Tonia says
Hi Judy,
Yes, the cuts go through to the center layer. Enjoy!
~Tonia
Tonia says
Thanks so much Sharla! Yes, the cutting is a bit tricky but worth it!
Sloane Schuyler says
This is a great recipe…
BUT…
There are some very unkind people responding to questions and I for one am not interested in someone being snarky towards me just because I ask a question for clarification
Too bad, this seemed like a nice website
Too many ‘mean girls’ for my taste
Regina says
Girl don’t let anyone steal your joy. She is the one everyone is saying, is that really necessary. Enjoy the site. We all are not mean. Plus she may had a bad day or abused as a child. Just pray for her and keep it moving.
Tonia says
Thank you for your support Regina!
Tonia says
Thanks Sloane! I hope you enjoy the apples! If you are ever concerned about asking a question, feel free to send it to me privately via the contact form.
Carolyn says
I just finished my first Bloomin Apple. It was one of the most delicious things I have ever tasted! Made it for the family. Hardest part is cutting the apples, but the worked out great! Yum yum yum
Tonia says
Fantastic! Thanks so much Carolyn! Yes, I would have to agree that cutting the apples is a bit fussy but worth it!
Deb Rasch says
I tried this awesomely tasty recipe! My only problem was I had to choose between very small or very large Honeycrisp apples.
I picked the large and had to cook them longer. They were still very good!! My husband loved it as well. I love Honeycrisp, so I wanted to stick with those. :}
Tonia says
Thanks Deb! I’m so glad they worked out for you!
Julie says
These were delicious. Made them twice this weekend!
Tonia says
Love it! You are my kind of gal! We made them 3 times during the “testing phase”! 🙂
Elena Fisher says
Yummmmmmy!!!! Trying it this weekend when my kids are all here,they love apple pie and we live in apple country so ill go right to the little stands that the farmers here have set up looking forward to it!!1 Thank you for such a great idea :O)
Tonia says
Fabulous! I hope everyone enjoyed them! Thanks Elena!
Christi says
Just tried this recipe! My husband loved it. So delicious!!!
Tonia says
Yay! Thanks so much Christi!
Penny says
Mine are in the oven now. I put a tsp. of milk in the center with the carmel to slow the re -hardening with ice cream. I also put a sprinkle of salt on the apple before the topping for a salted carmel flavor. Can’t wait!
Tonia says
Great idea, Penny! And I love the sound of salted caramel!
Nadia says
I think some of the posters just misunderstood unwrapped as unopened. That is why they were questioning the directions.
Tonia says
Very true! Thanks Nadia!
roseann says
anyway to make this way less fattening. besides eating a plain old apple
karen says
You could try splenda brown sugar, I use half of what the recipe says, also maybe sugar free smuckers caramel topping might work. Hope you can enjoy one!
Gloria says
Karen, thanks for posting these alternatives, I am diabetic and am wanting to try this!
Tonia says
Thanks for the suggestions Karen!
Bridget says
Thank you for this post!!! My mom used to make us baked apples in the fall, and she would sprinkle them with brown sugar and cinnamon,and pour a little cream over them. I LOVED them, but these look even better! I can’t wait to try!! Just wondering: do you think it sugar-free caramels would work? And Splenda brown sugar? I’m supposed to be on a diet…but I want one of these so badly!!! 😀
Tonia says
Thanks Bridget! Yes, I think that would work great! Enjoy!
Toni Knish says
What do you think about baking them in foil cupcake liners in a muffin tin? LOVE LOVE LOVE this recipe!! THX!!
Tonia says
Hi Toni,
Thank you! If you can find small enough apples, it might work. I’m just not sure if you would get as much “bloom” because there wouldn’t be room for the apple slices to open. Happy Baking!
~Tonia
Tara @jefferson ar says
AWESOME AND SO UNIQUE!!! MY GRANDKIDS THINK I AM A GENIUS!!!SWISH!!!i AM ENJOYING THE MOMENT…
Tonia says
Love it! It’s always a bonus when you can made grandkids happy. Thanks so much Tara!