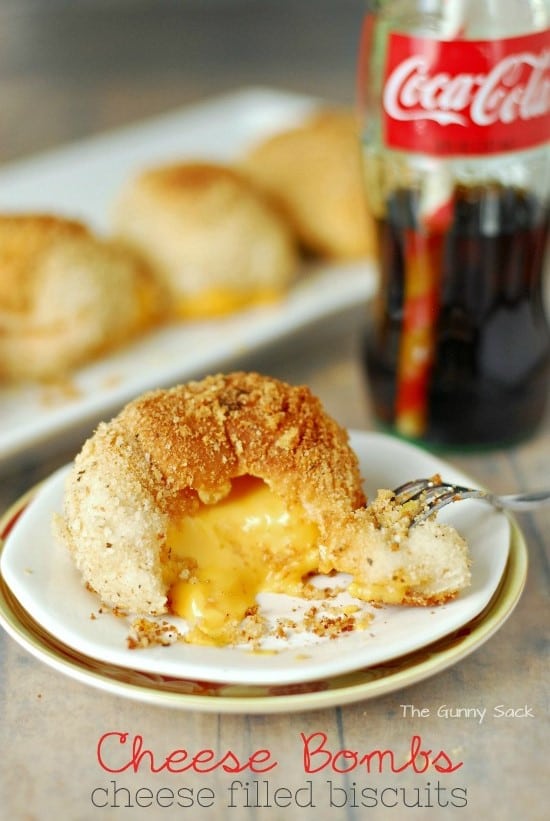
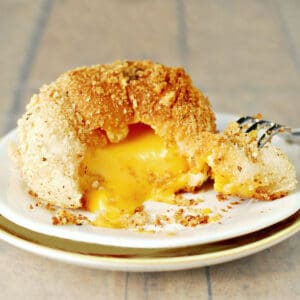
These Cheese Bombs have a delicious crunchy coating with warm, melted cheese on the inside!
There are so many different kinds of pizza balls to make that I wasn’t sure which one to make next. Since we are a cheese loving family and always have multiple kinds of cheese in the fridge, I figured I should make cheese pizza balls. But then, I got to thinking about eating cheese on a stick.
Have you ever tried it? Cheese on a stick is a big piece of deep fried cheese that is somewhat like a corn dog. Once I started thinking about it, regular old cheese pizza balls didn’t sound nearly as good. So, I switched from making another cheese pizza balls to making cheese bombs! Even the name sounds delicious!
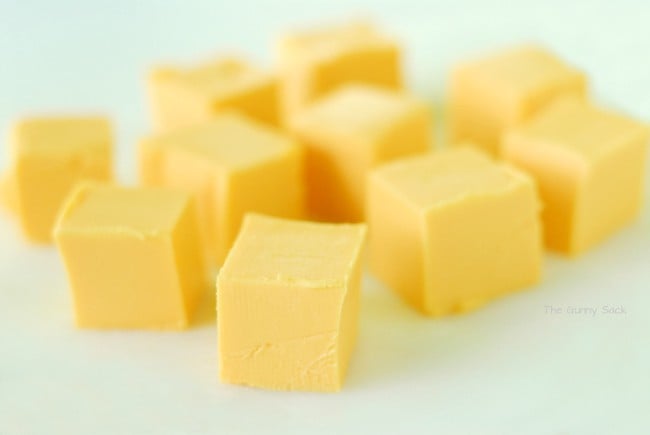
Start by cutting a soft cheese that melts easily (like Velveeta) into 1 ounce squares. Using the 4 ounce lines on the cheese package, I cut 4 ounce pieces of cheese and cut each of them into 4 (1 ounce) pieces.
Place the cheese squares in the freezer for at least one hour or until frozen. This step is VERY important so don’t skip it!

Mix together Italian style bread crumbs, panko bread crumbs, Parmesan, garlic salt and black pepper. Melt butter in a small bowl and remove the cheese squares from the freezer. Flatten 10 buttermilk refrigerator biscuits and place a cheese square on each one.
Wrap the biscuit dough around the frozen cheese and pinch the edges together to seal well. Dip it in the melted butter and then coat with the bread crumb mixture. Place in a greased pie pan with the seam down.
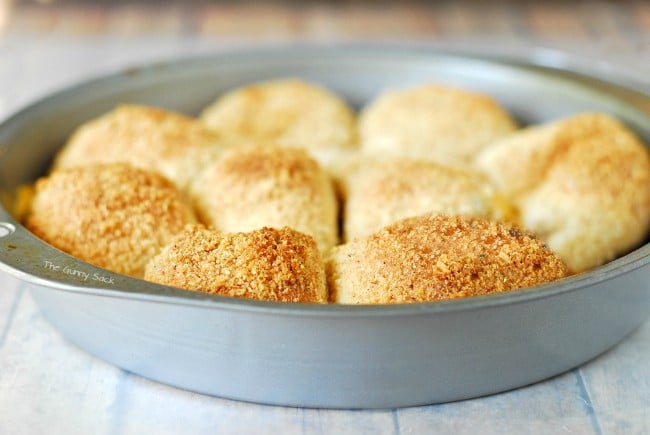
Bake at 425°F for 12-16 minutes or until golden brown.
Okay, here are a couple of things to keep in mind…
I am a foodie blogger/photographer in the business of showing pretty things therefore I am going to show you the best side of things.
Yes, one of the cooked cheese bombs is missing in the picture above…it was eaten and thoroughly enjoyed.
More than one of the cheese bombs exploded {pun intended} while baking but still tasted just as good.
Some of cheese oozed out of the cheese bombs even when they were placed with the seam down. That oozed cheese got nice and crispy and was quickly eaten.
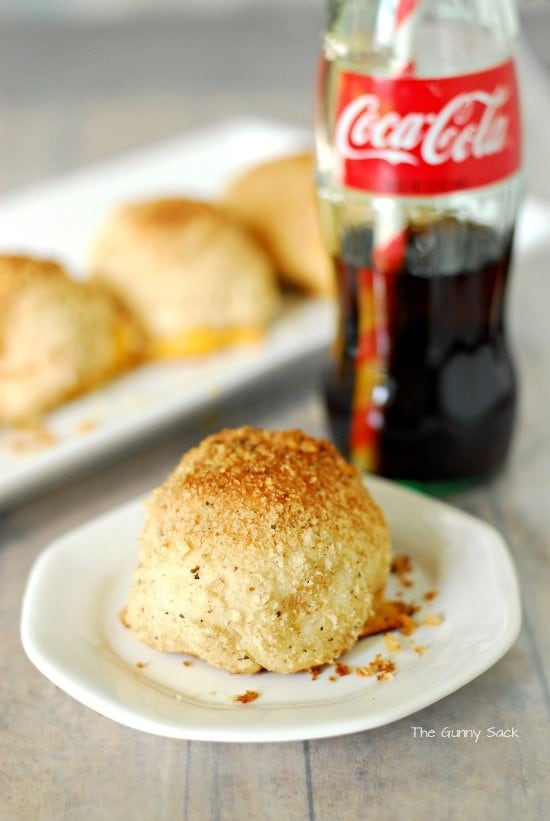
My kids loved these cheese bombs and are already asking me to make them again!
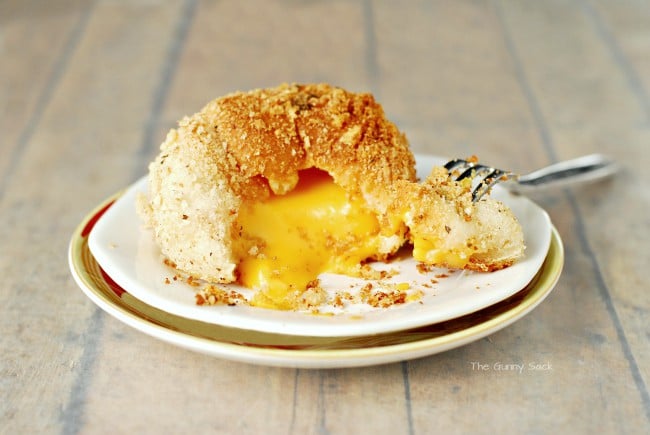
Oh yeah! A cheese bomb!
Cheese Bombs
Ingredients
- 16.3 ounce tube Pillsbury Grands Biscuits 5 count
- 10 ounces Velveeta
- ¼ cup butter
- ½ cup Italian Style Bread Crumbs
- ½ cup panko Japanese style bread crumbs
- ¼ cup grated Parmesan
- ½ teaspoon garlic salt
- ¼ teaspoon black pepper
Instructions
- Start by cutting a soft cheese that melts easily (like Velveeta) into 1-ounce squares. Using the 4-ounce lines on the cheese package, cut 4-ounce slices of cheese and cut each of them into four 1-ounce pieces. Place the cheese squares in the freezer for at least one hour or until frozen. This step is VERY important!
- Preheat oven to 425°F.
- Mix together Italian style bread crumbs, panko bread crumbs, Parmesan, garlic salt and black pepper in a small bowl.
- Melt butter in a small bowl.
- Remove the cheese squares from the freezer.
- Cut the biscuits in half and flatten them. Place a cheese square on each one.
- Wrap the biscuit dough around the frozen cheese and pinch the edges together to seal well.
- Dip in the melted butter and coat with the bread crumb mixture.
- Place in a greased pie pan with the seam down.
- Bake at 425°F for 12-16 minutes or until golden brown.
Notes
Nutrition
More pizza balls recipes:
 Pepperoni Pizza Balls
 Bacon Cheeseburger Pizza Balls
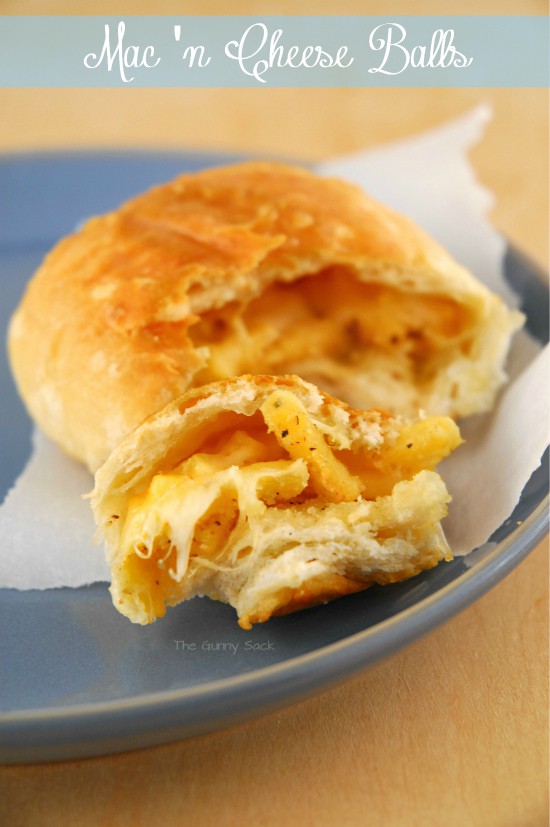 Macaroni and Cheese Balls

Kirana Jacobsen says
Can I use mozzarella cheese? If I can, how long will these cheese bombs last?
nema says
was wondering if i could use monterey jack cheese shredded maybe, instead of velveeta cheese
Tonia says
Yes, you can use any cheese you want. The softer cheeses will have more of a melting, cheese bomb look. Enjoy!
Chris says
Been looking at your site in the office. Now I got my staff hungry. I guess I’ll be making something soon! Thanks for the recipes!
GrannyG says
Could you use mozzarella cheese instead of Velveeta?
Tonia says
Yes, I think that would be delicious! Enjoy! ~Tonia
Sternberg says
What if you were to put triangles of that cheese inside of crescent rolls?
Tonia says
Ohhh…I like the sound of that! Crescent rolls are delicious by themselves so imagine them filled with cheese!
Marya says
Whenever I find a good recipe, I like to look at the comments to see if anybody who has made them has came back and commented on them. Well I’m returning the favor.
These were fabulous ! My husband loved them. definitely going to make different variations next time. SO glad I found this recipe!
Tonia says
Thanks so much Marya! My son has been begging me to make these again so I will be making them soon!
Joy says
Question: The cheese looks like it was rolled in the bread crumb mixture, was it and then covered with the biscuit and rolled again? Either way they look delicious and I will be making them.
Thank you for sharing your ideas.
nonie says
I was wondering what side dish would go with the these cheese bombs I really want to make them.
Mackenzie says
Those look amazing! I love the ‘ball’ collection you’ve created! 🙂
Tonia says
Thanks! I love all of them!
Jocelyn@BruCrew Life says
Now here’s something my kids would truly love!! They look too good!
Tonia says
Thanks Jocelyn!
Kristen Duke says
These look tasty!
Julie @ Julie's Eats & Treats says
Wow…I think I’m drooling. These are the bomb!
Tonia says
Thanks Julie! Wipe the drool off and make some! 🙂
Hayley @ The Domestic Rebel says
Oh my gosh, my mouth just watered! These look INSANE. Like a little grilled cheese bomb!
Lyuba@willcookforsmiles says
Oh how fun! I’m sure kids and adults would love these 🙂
Becca @ Amuse Your Bouche says
Oh my goodness I think my chin just hit the floor. These look incredible!!
Chung-Ah | Damn Delicious says
How could anyone resist that ooey goey cheesy interior?!
Tonia says
I sure can’t! Thanks Chung-Ah!
Jenna says
uh oh, these look so ooey gooey cheesy good! Thanks Tonia!
Nancy P.@thebittersideofsweet says
I have to make these! The kids would love it!
Tonia says
Thanks, Nancy!
Jessica Shook says
Im Making These Today Ill Tell You My Results <3 Would Love To Post Up A Pic 2 🙂