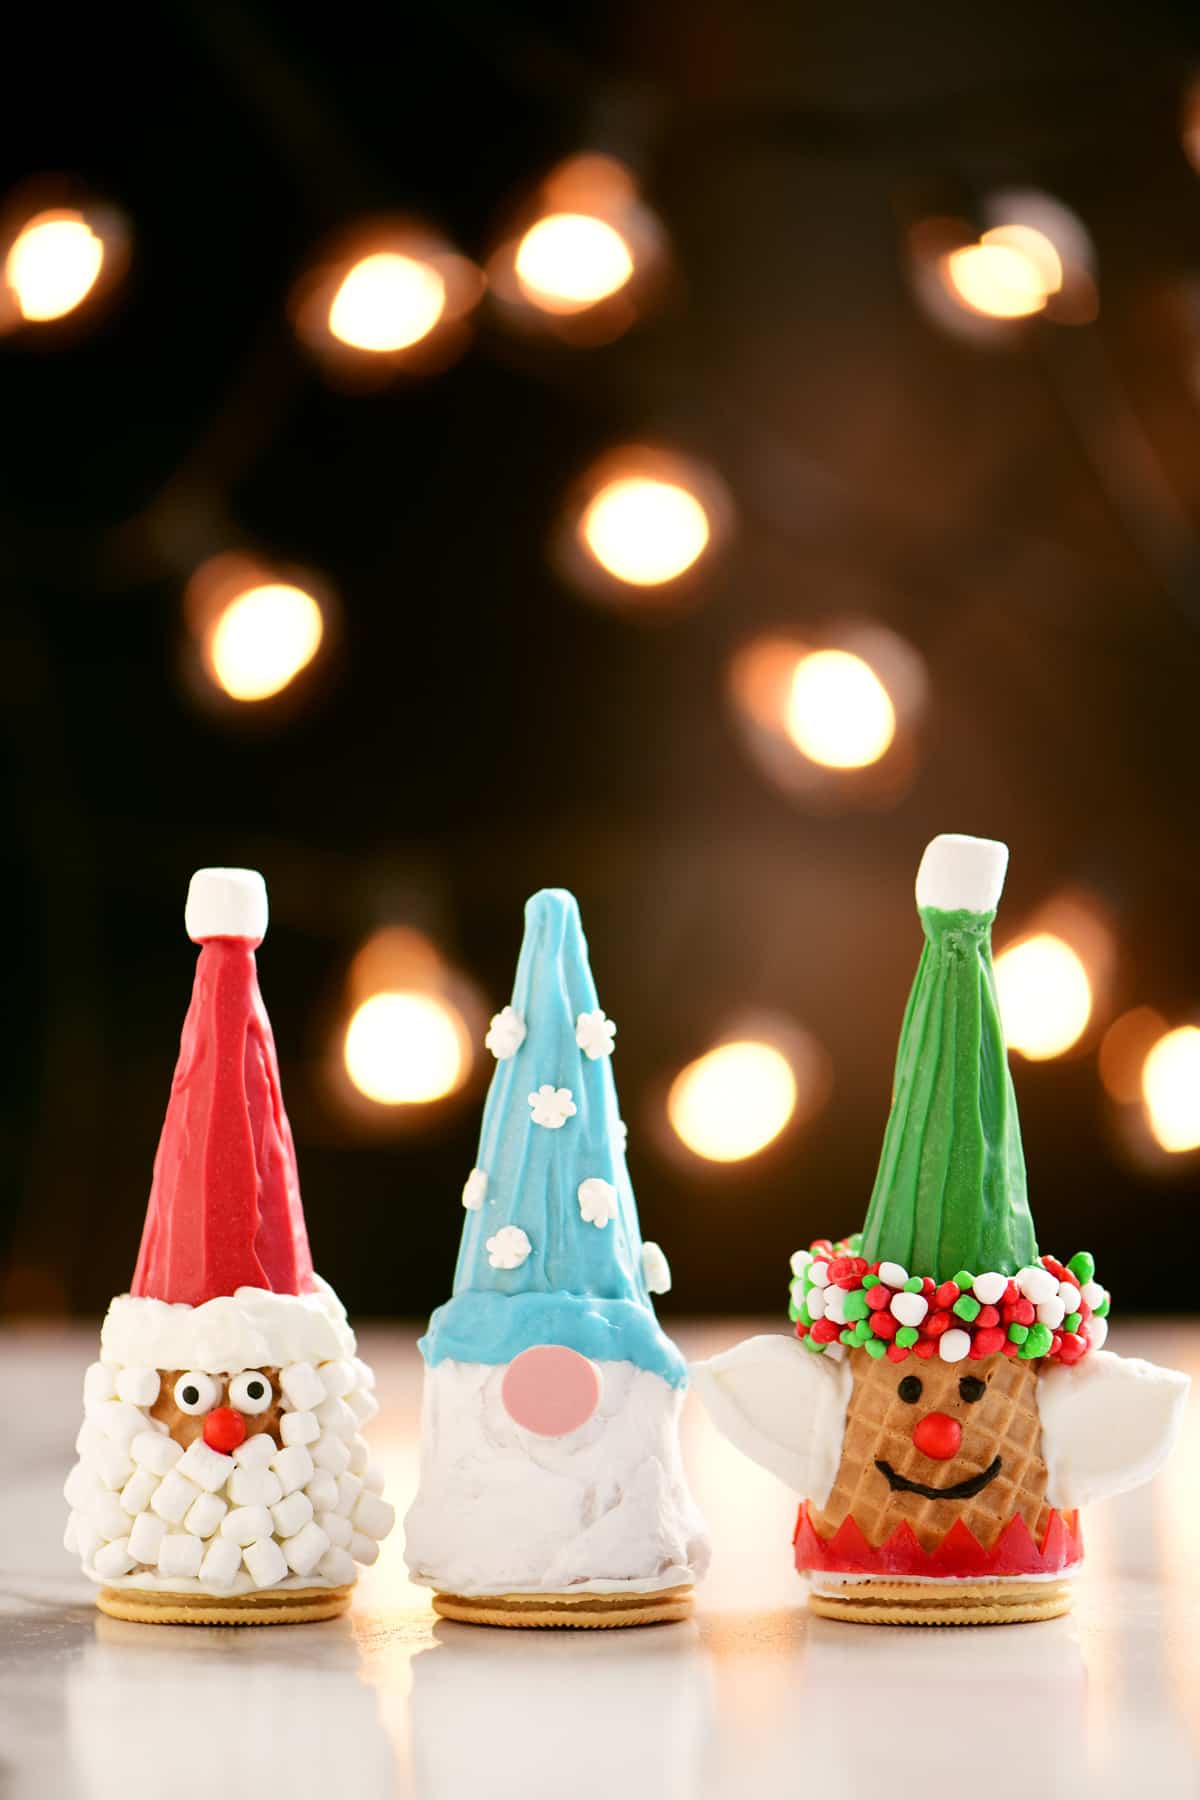
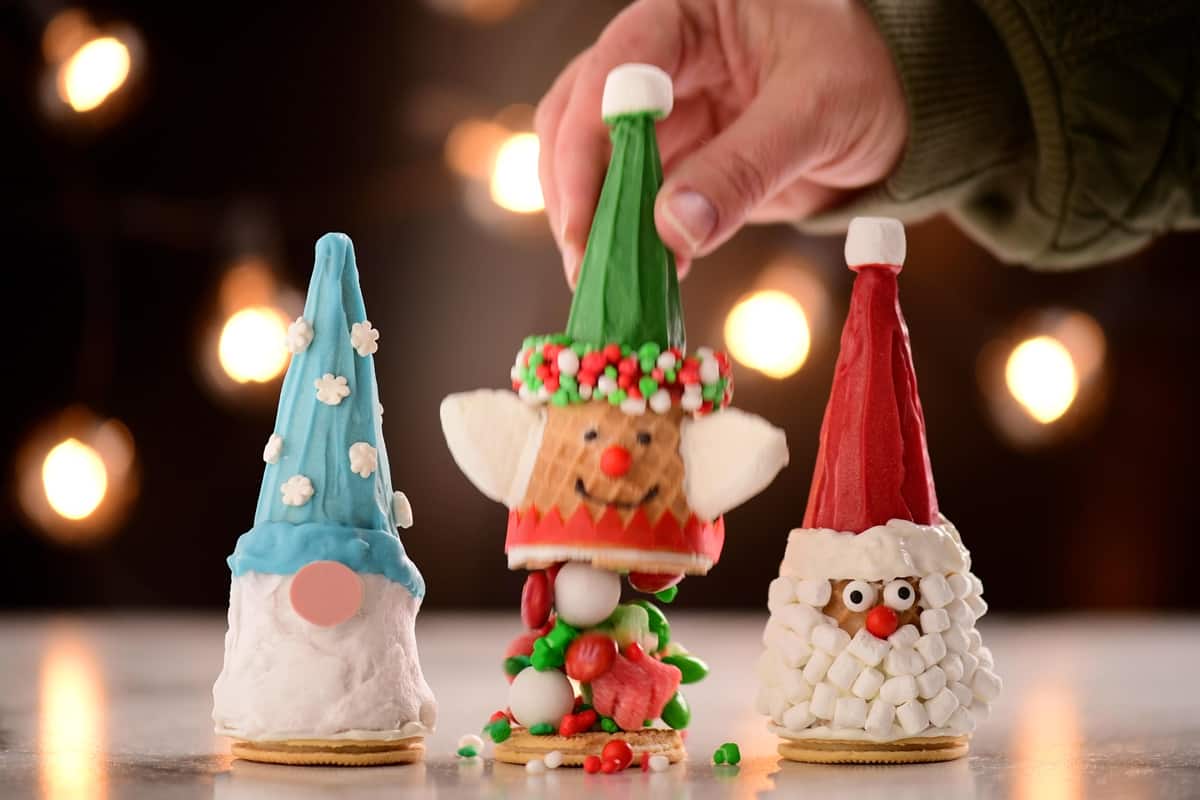
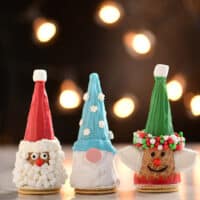
These adorable Christmas Cones have a fun surprise inside! The Santa cones, Elf cones, and Gnome cones are filled with candy and sprinkles.
The Christmas cones are a great way to let your kids help with holiday baking! They can each choose a cone to make and decorate it however they want to.
Included In This Post
Santa Cones
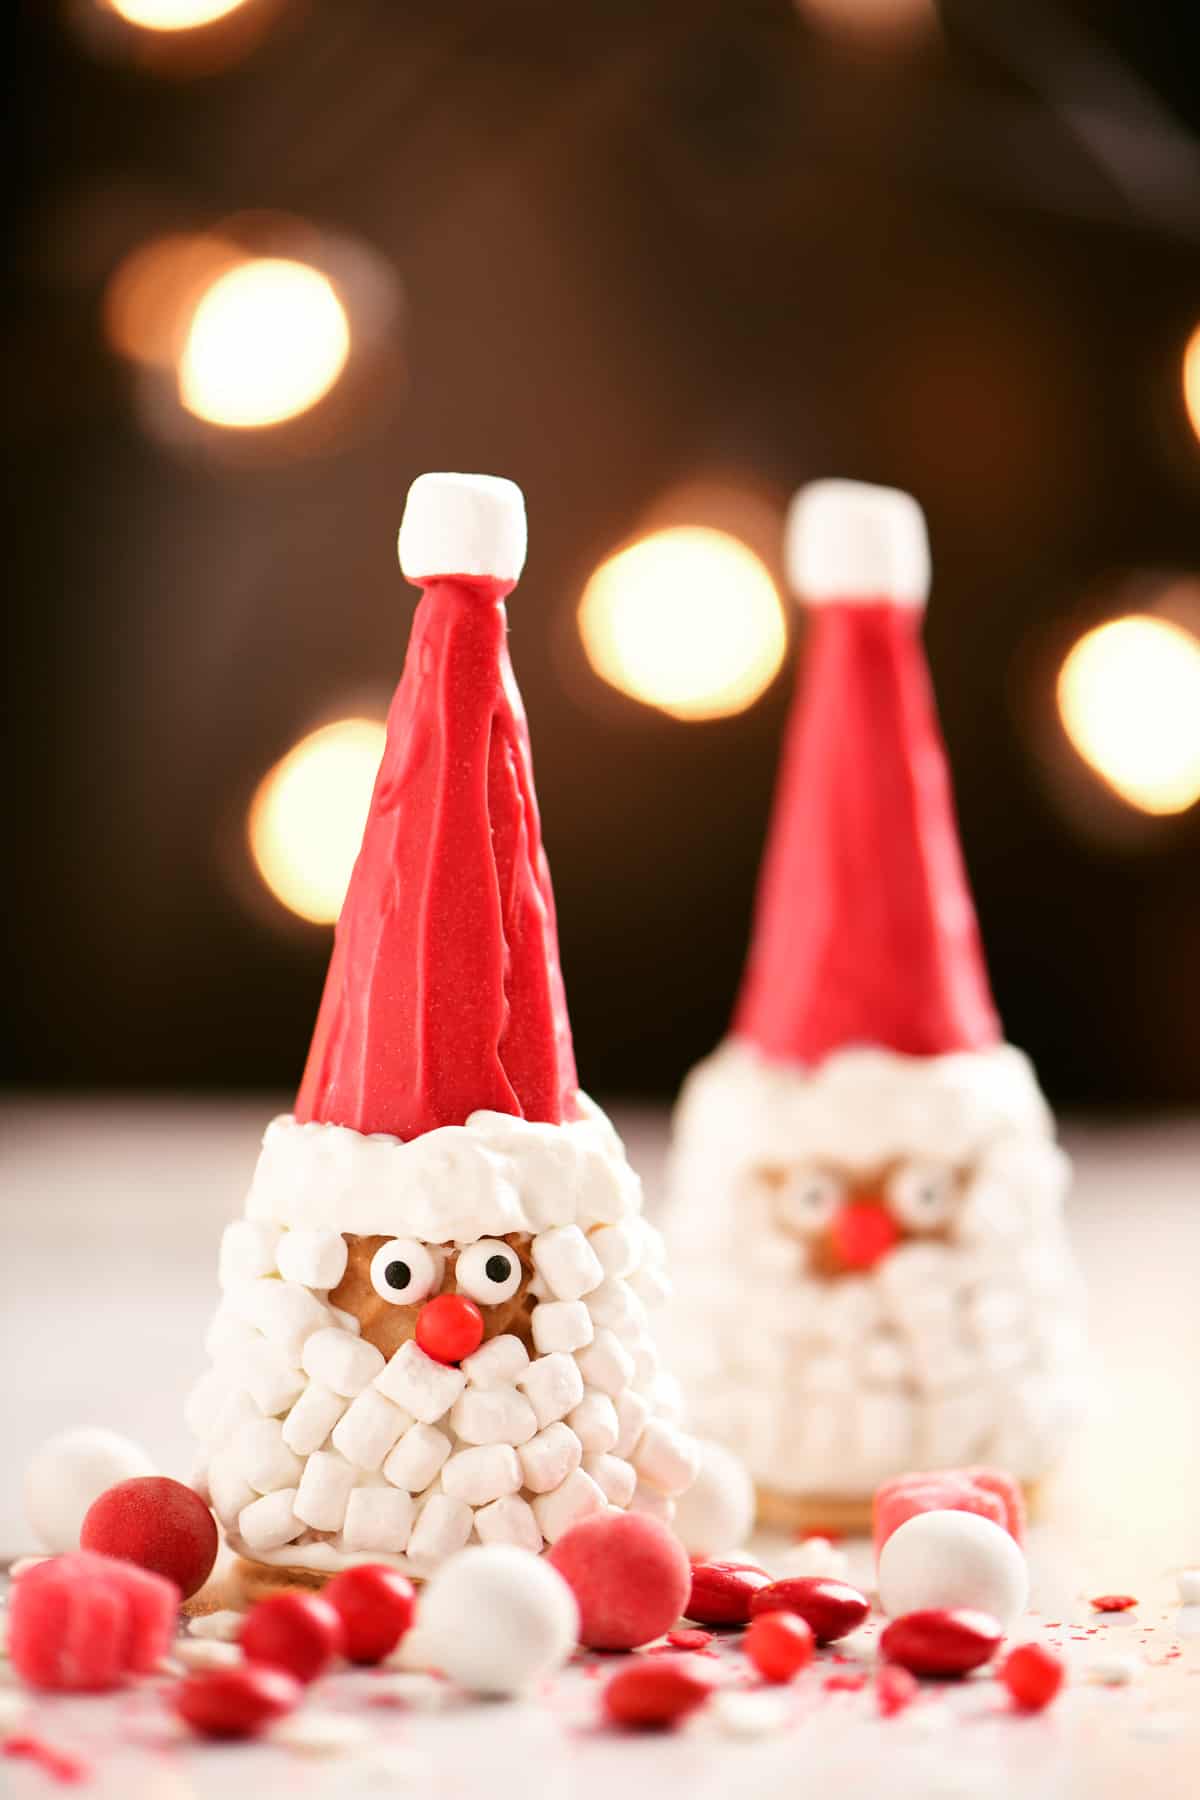
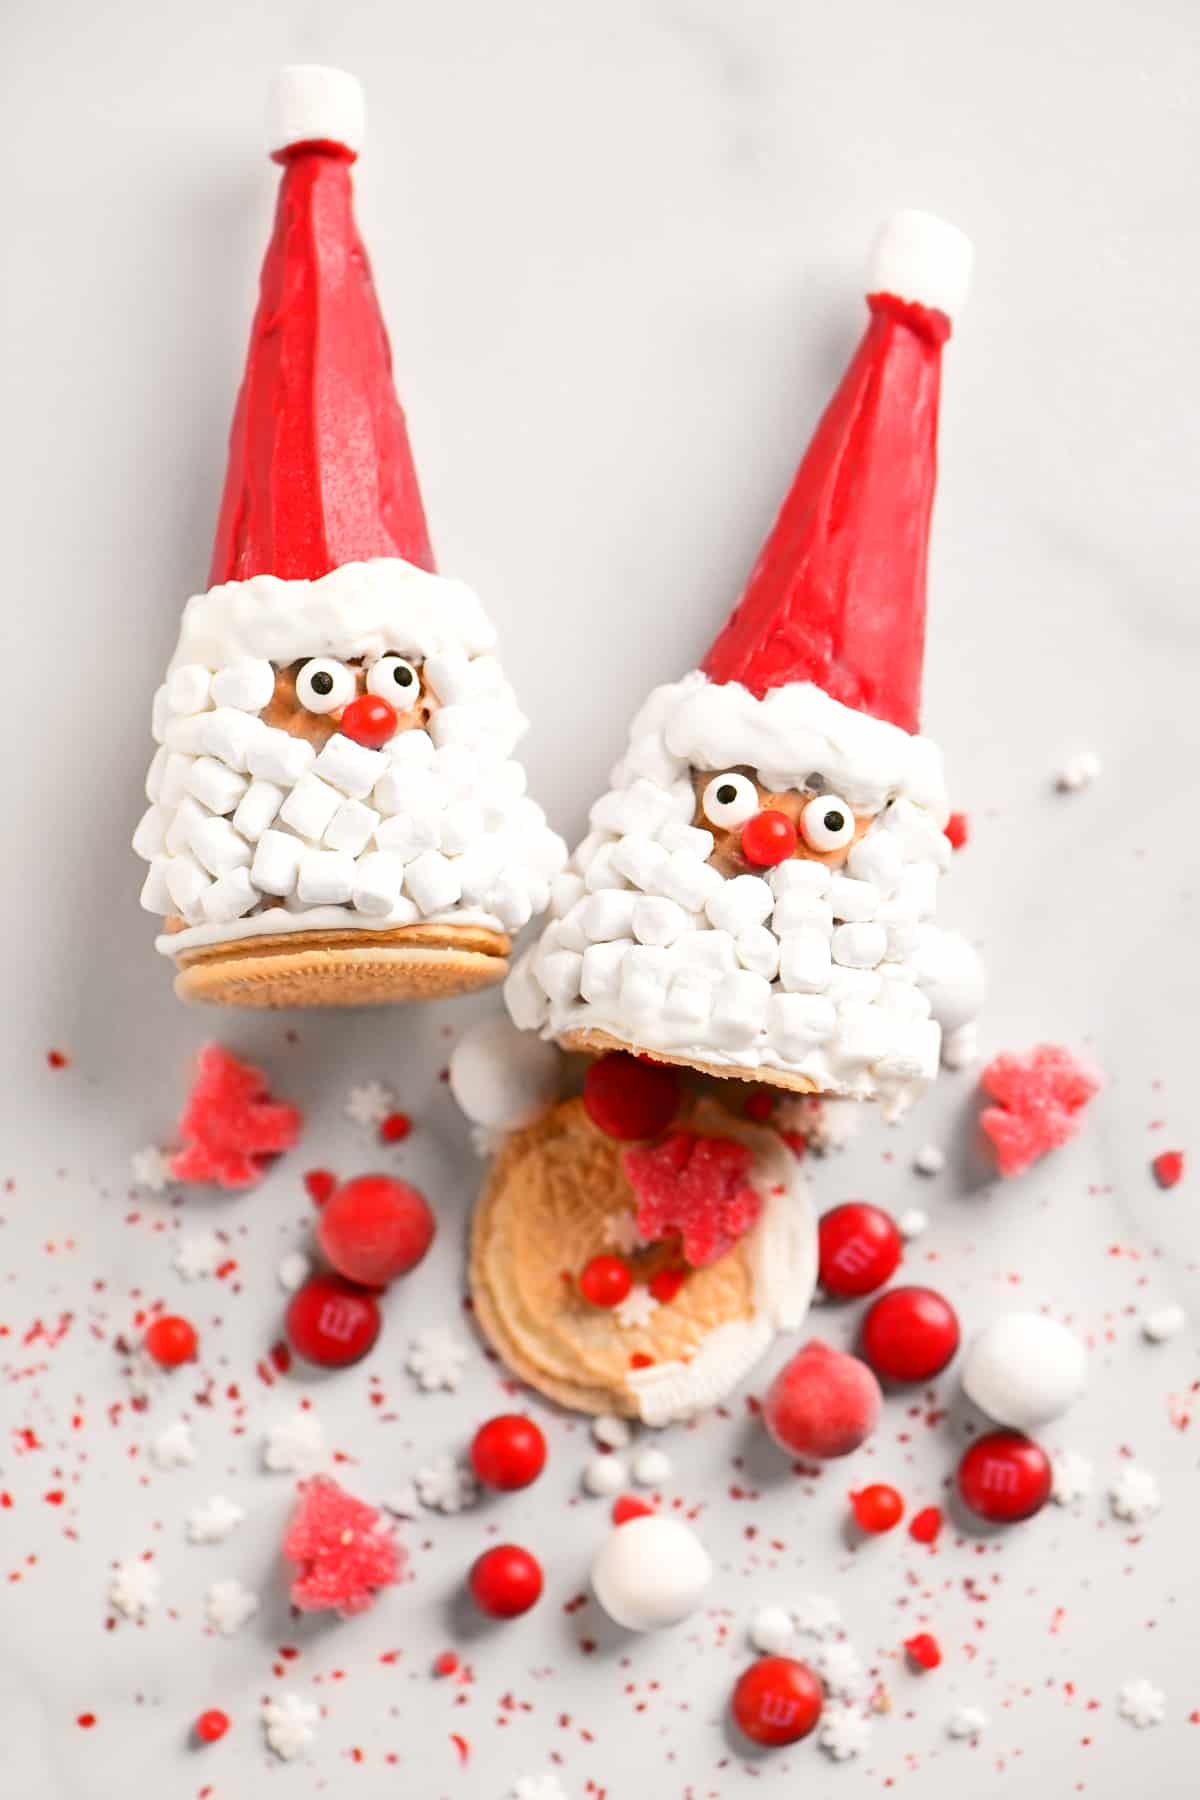
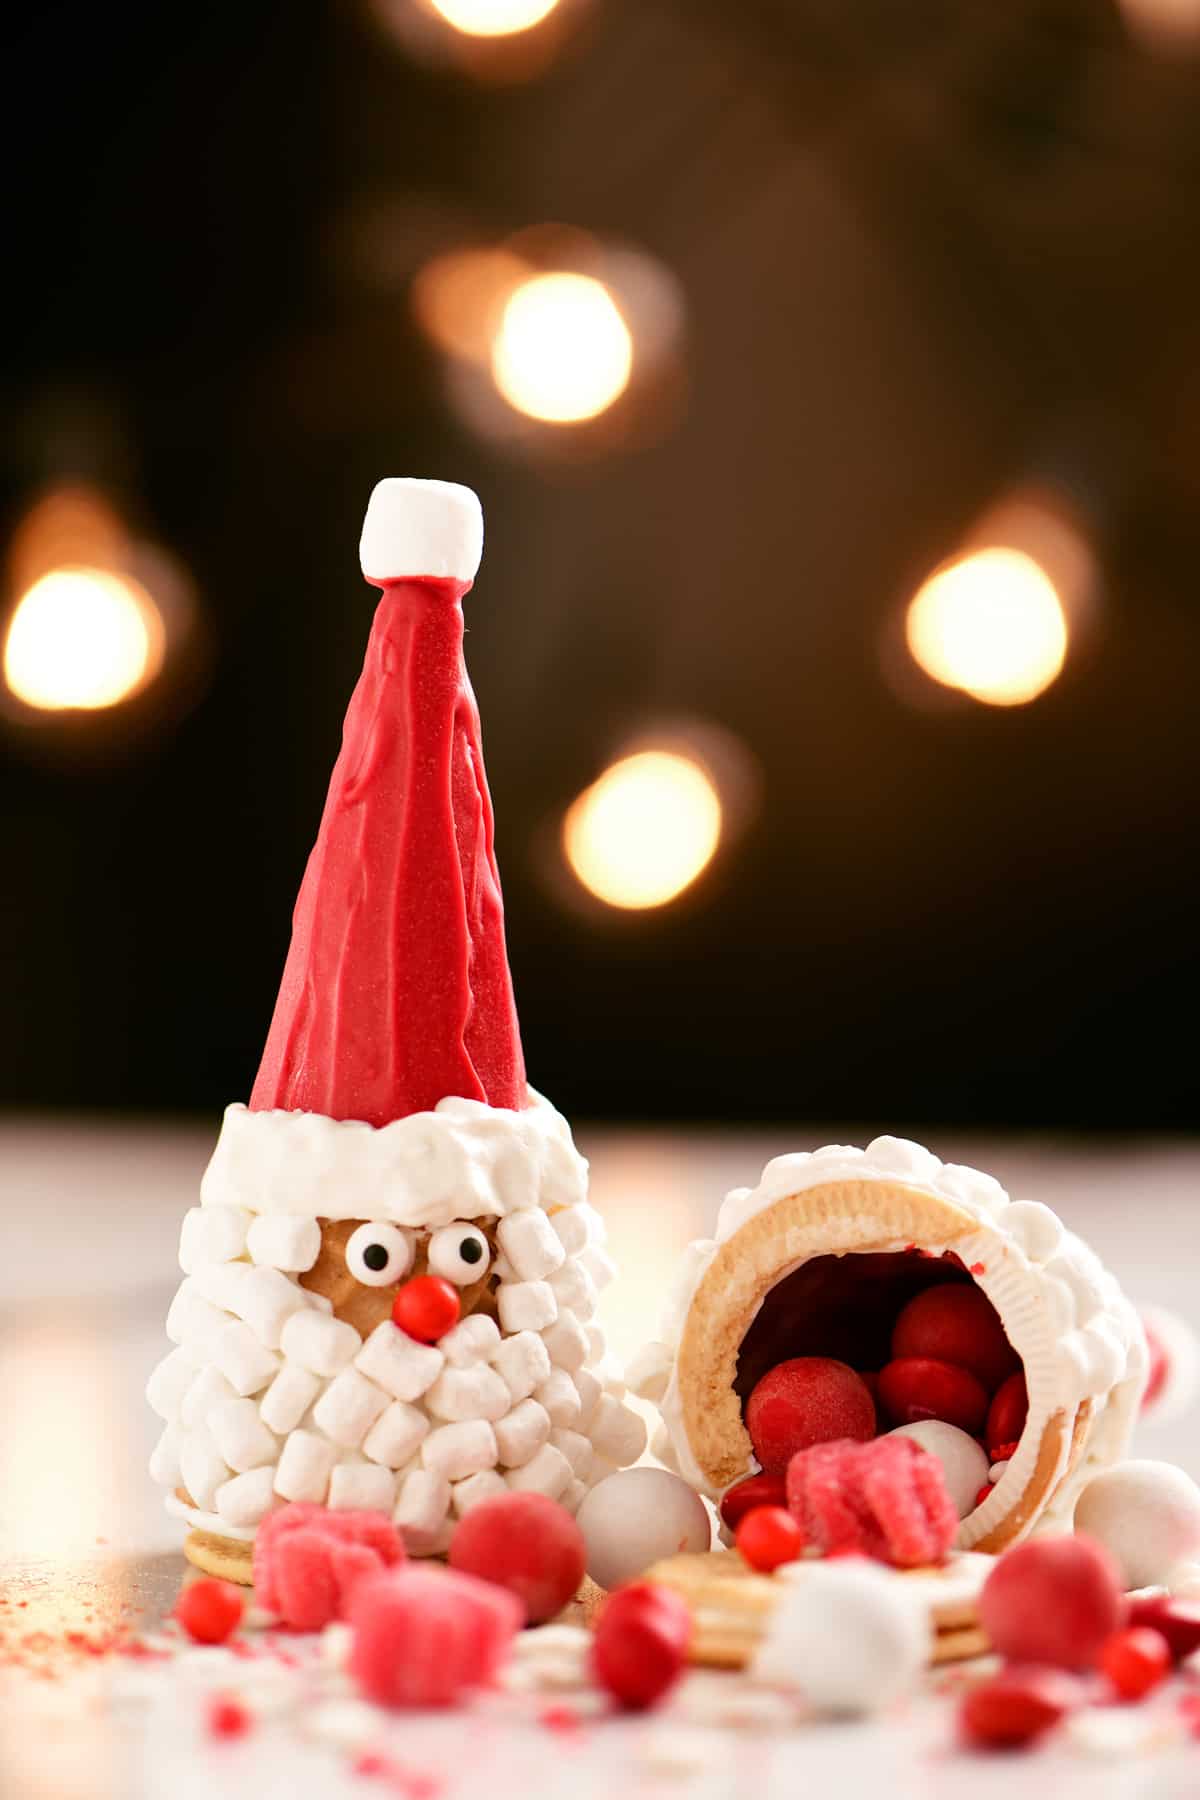
We had so many ideas for these Christmas Cones but had to narrow the selections down to only a few, and Santa had to be included! These Santa Cones are totally edible, from the decorations on the outside to the candy on the inside.
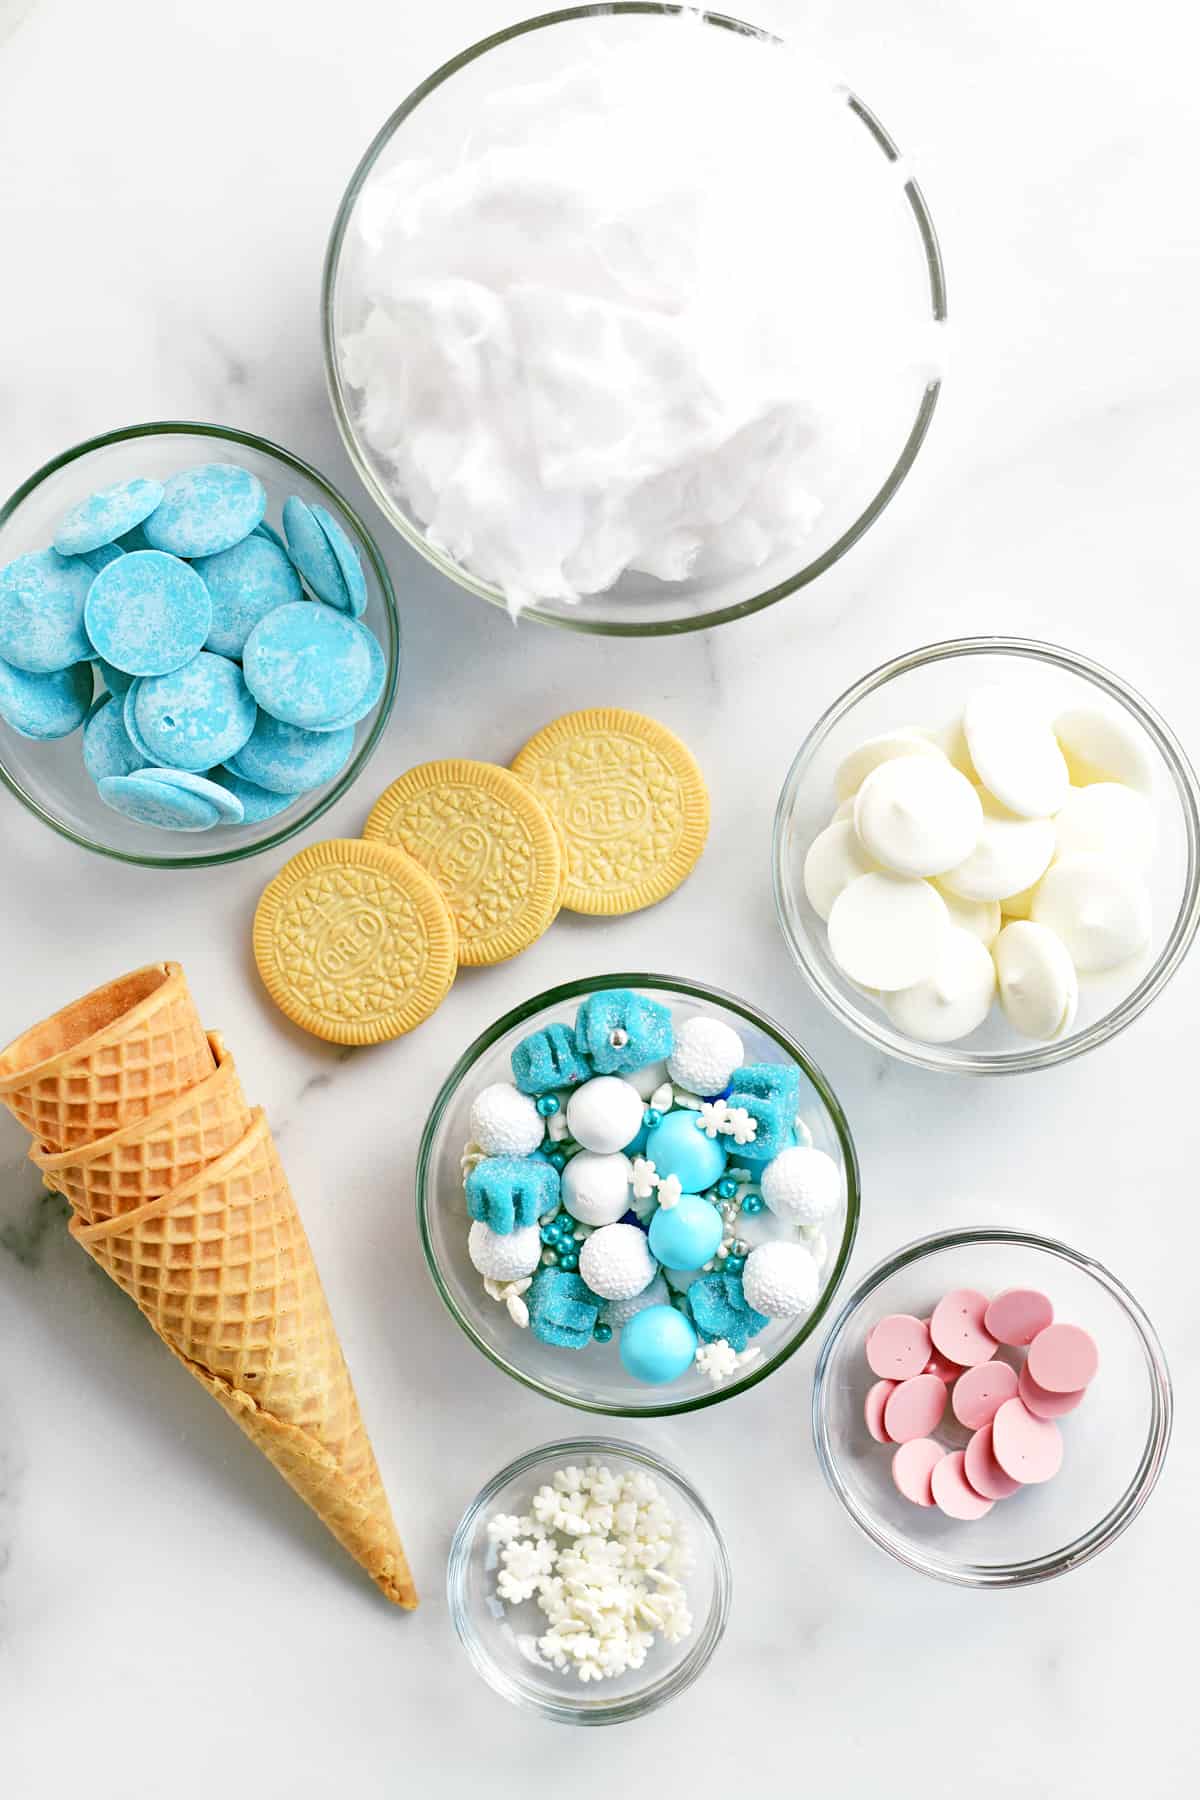
Santa Cones Ingredients
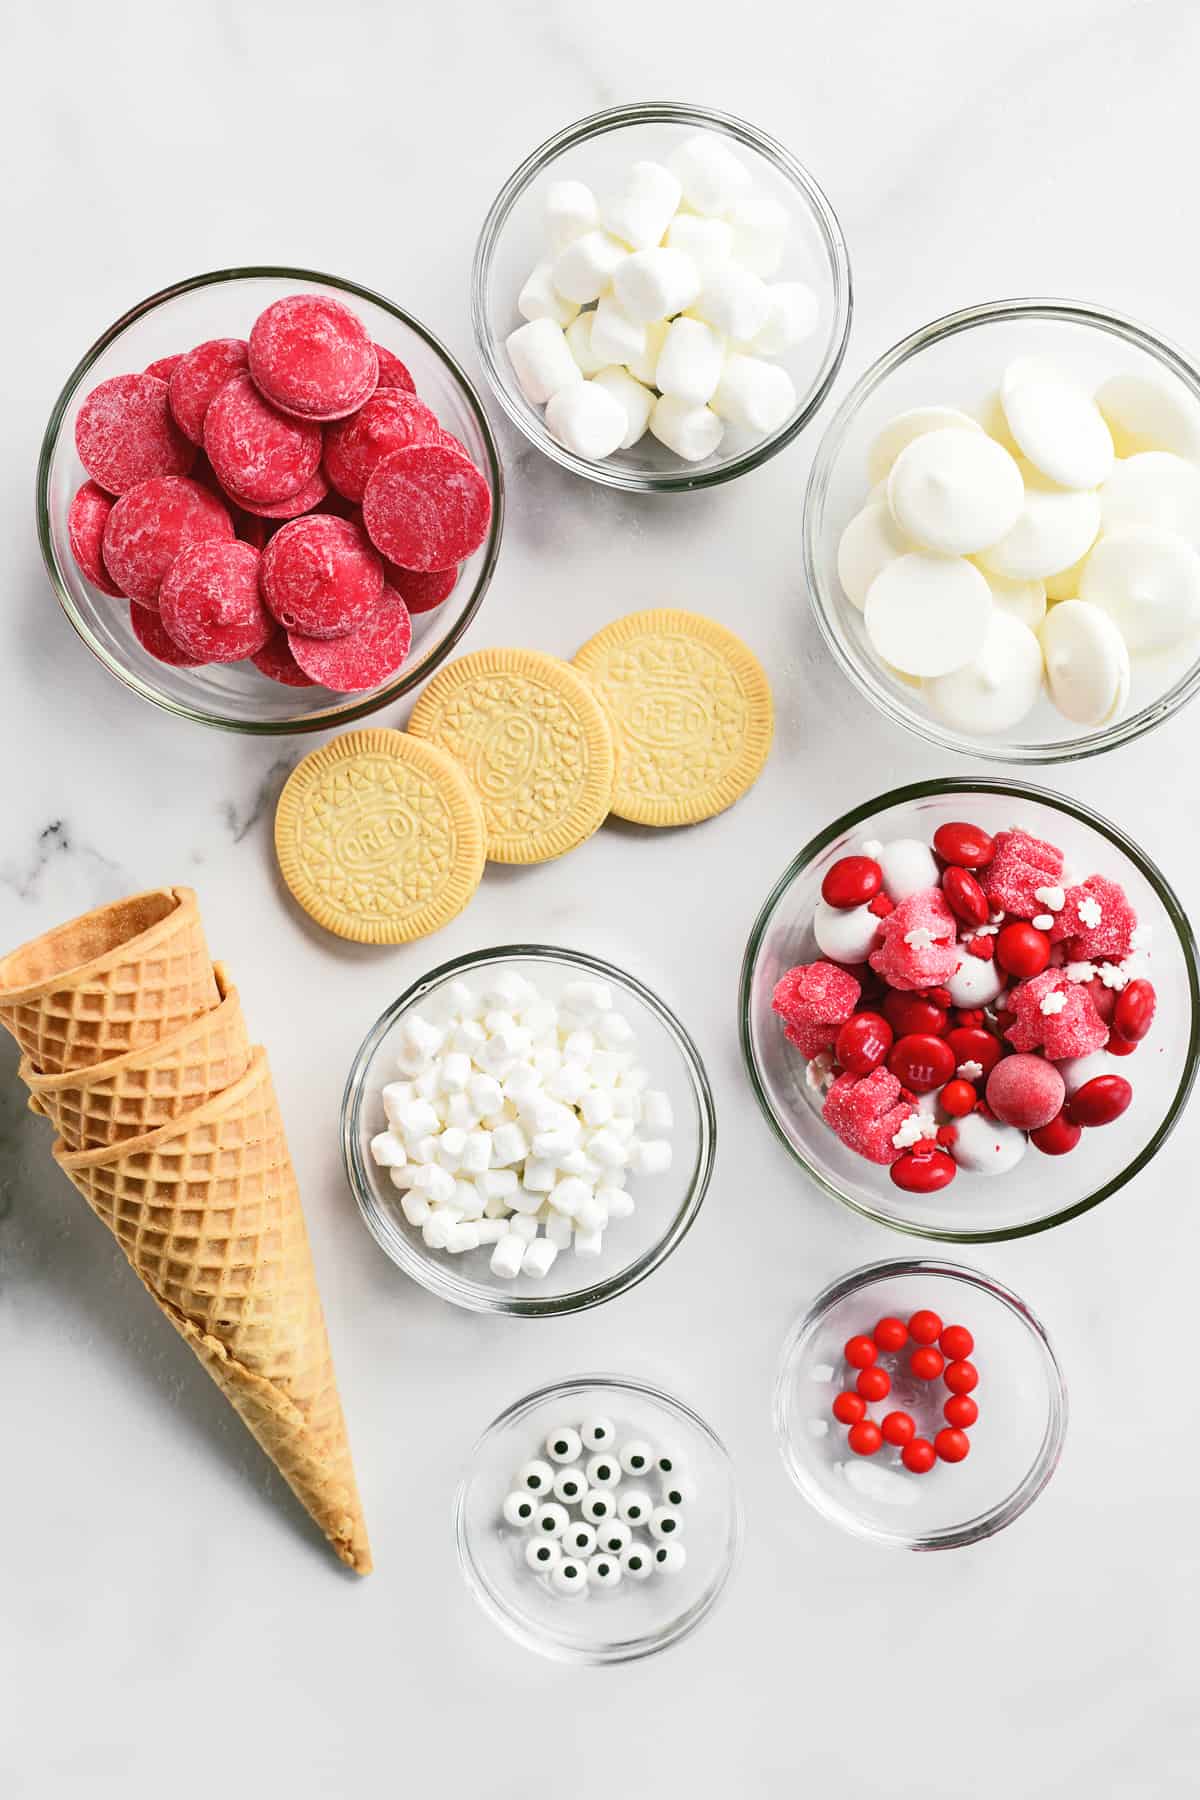
To make the Santa Christmas Cones, you’ll need ice cream cones, decorations, and fillings!
- Ice Cream Cones: We used regular sugar cones for this recipe because of the pointy tips. You could use cake cones if you want a flat hat. Or use waffle cones to make a HUGE version.
- Candy Wafers: You’ll need both red and white candy wafers (also known as candy melts) to decorate these Santas.
- Marshmallows: This recipe calls for two kinds of marshmallows: mini marshmallows and dehydrated marshmallow bits. The mini marshmallows go on the top and on the hat brim. And the dehydrated marshmallow bits are used to make Santa’s beard.
- Sprinkles: We used eyeball sprinkles for the eyes and a round red sprinkle for the nose.
- Candy: Santa is filled with red and white candy and sprinkles of various kinds.
- Cookies: The candy is held inside the cones by a cookie. We found that golden Oreo thins were the perfect size and color.
How To Make Santa Christmas Cones
There are three steps to making the Santa Christmas Cones: decorate, fill, and seal. Let your kids join in on the fun by allowing them to decorate their own cones.
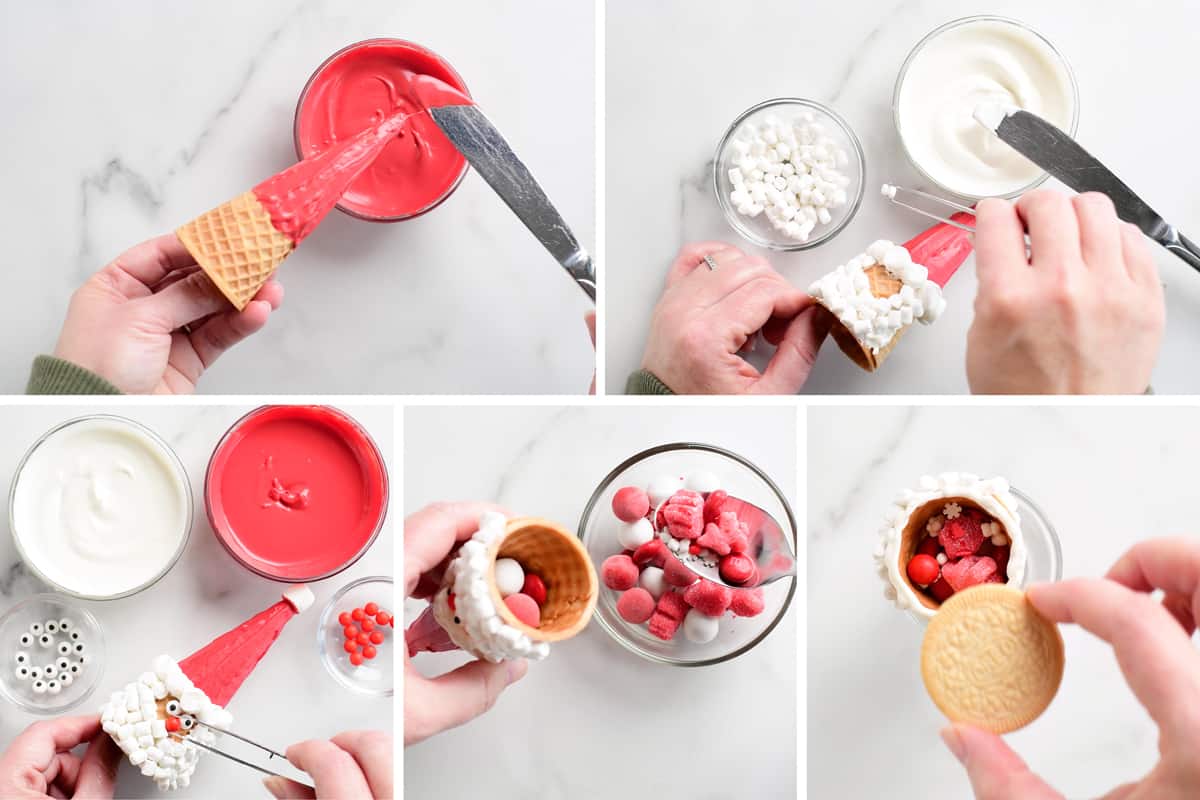
- Decorate: Use the melted candy wafers to make Santa’s hat and beard. Then use it to attach the marshmallows and sprinkles.
- Fill: Once the candy coating has hardened, place the cones in glass and fill them with red and white candies and sprinkles.
- Seal: Use melted white candy wafers to attach the golden Oreo thins over the opening, sealing the candy inside.
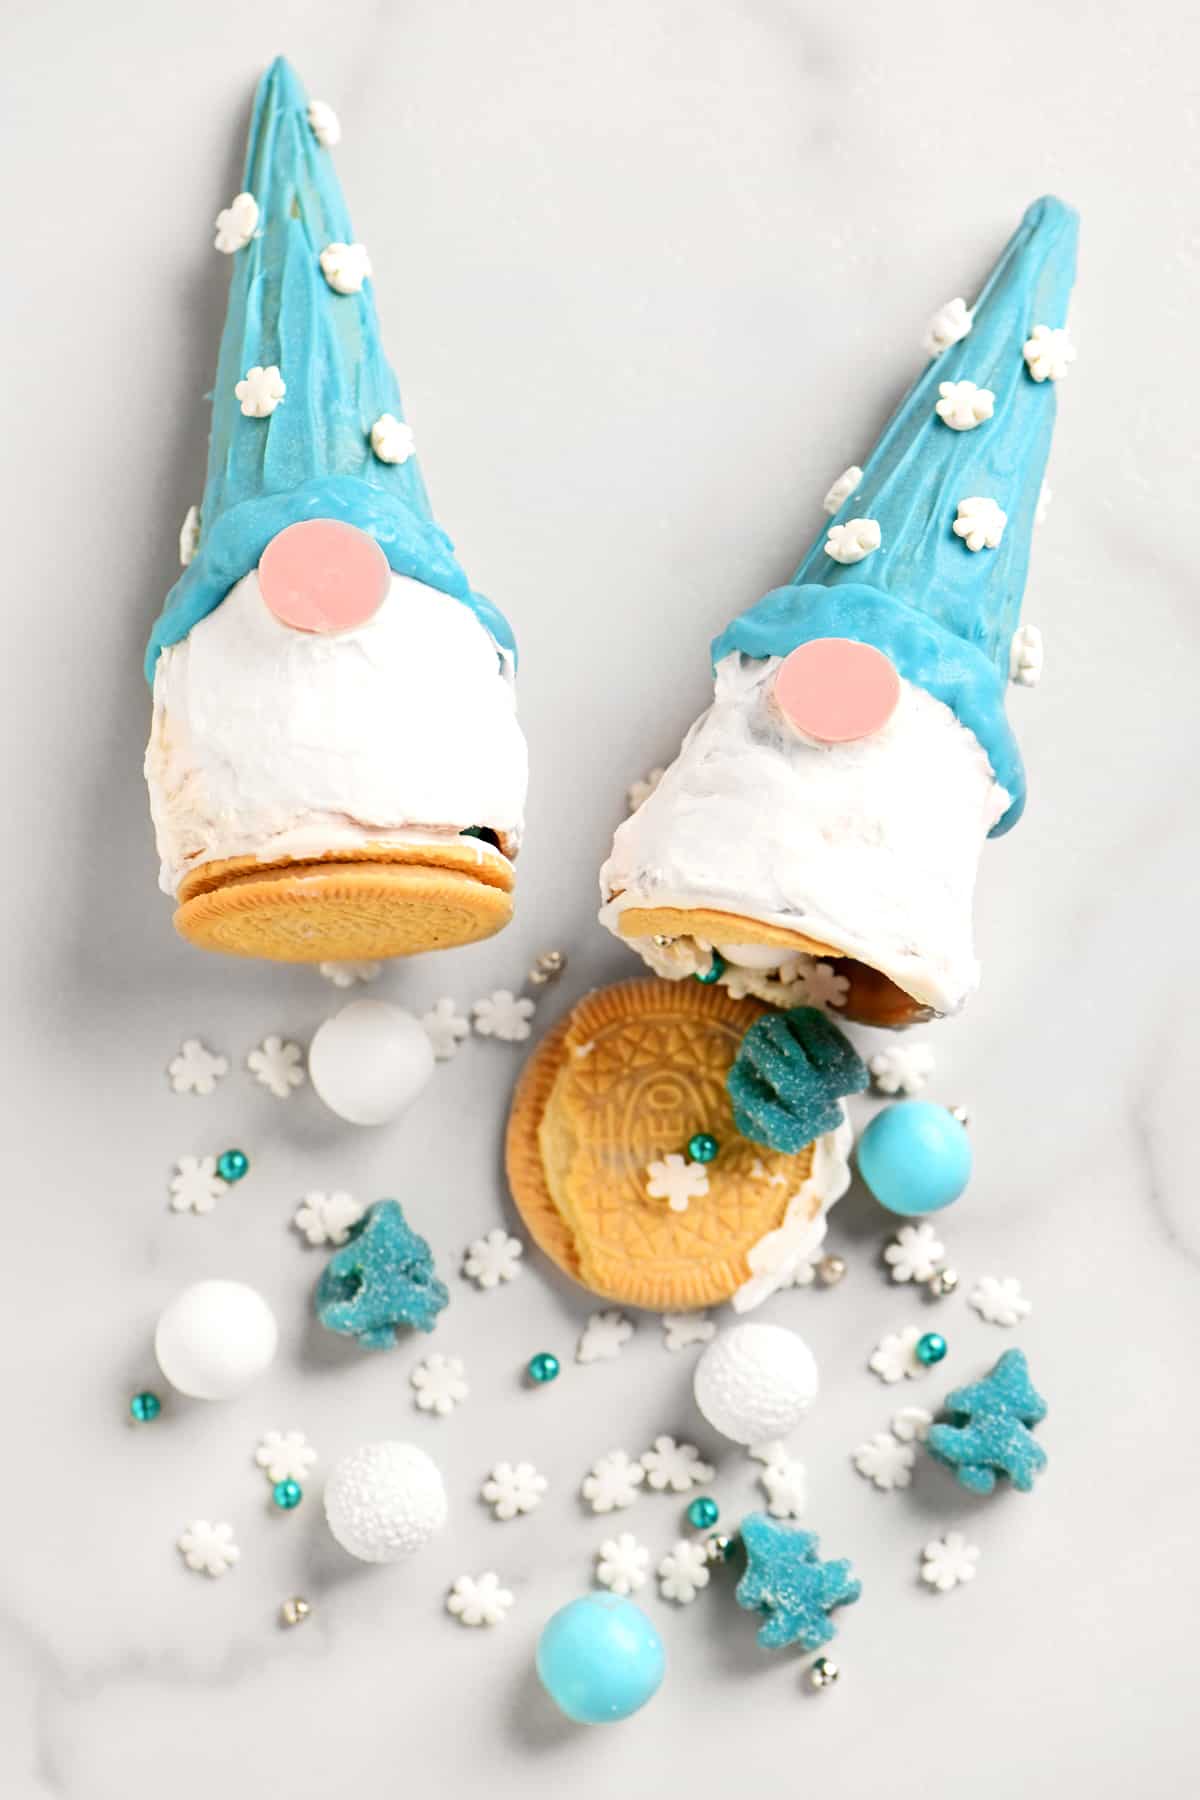
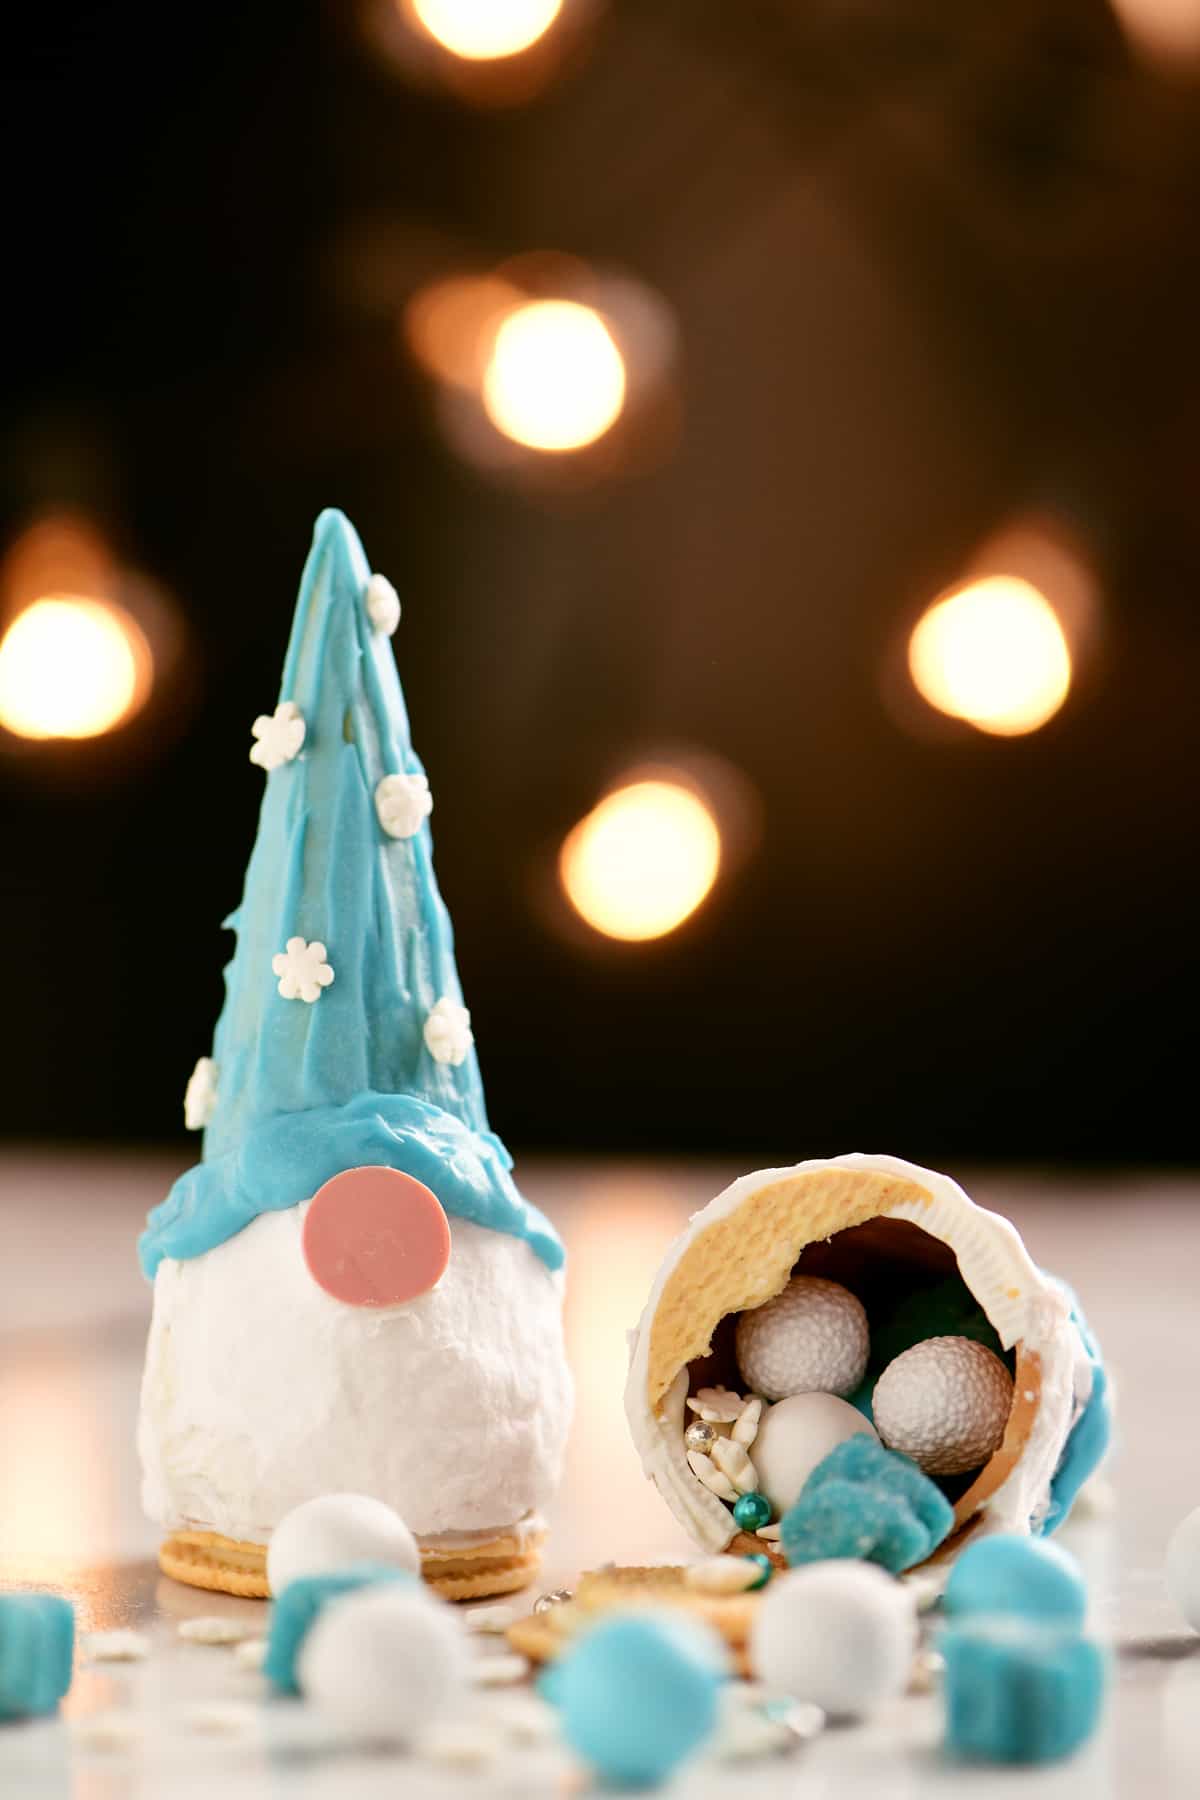
Christmas Gnome Cones
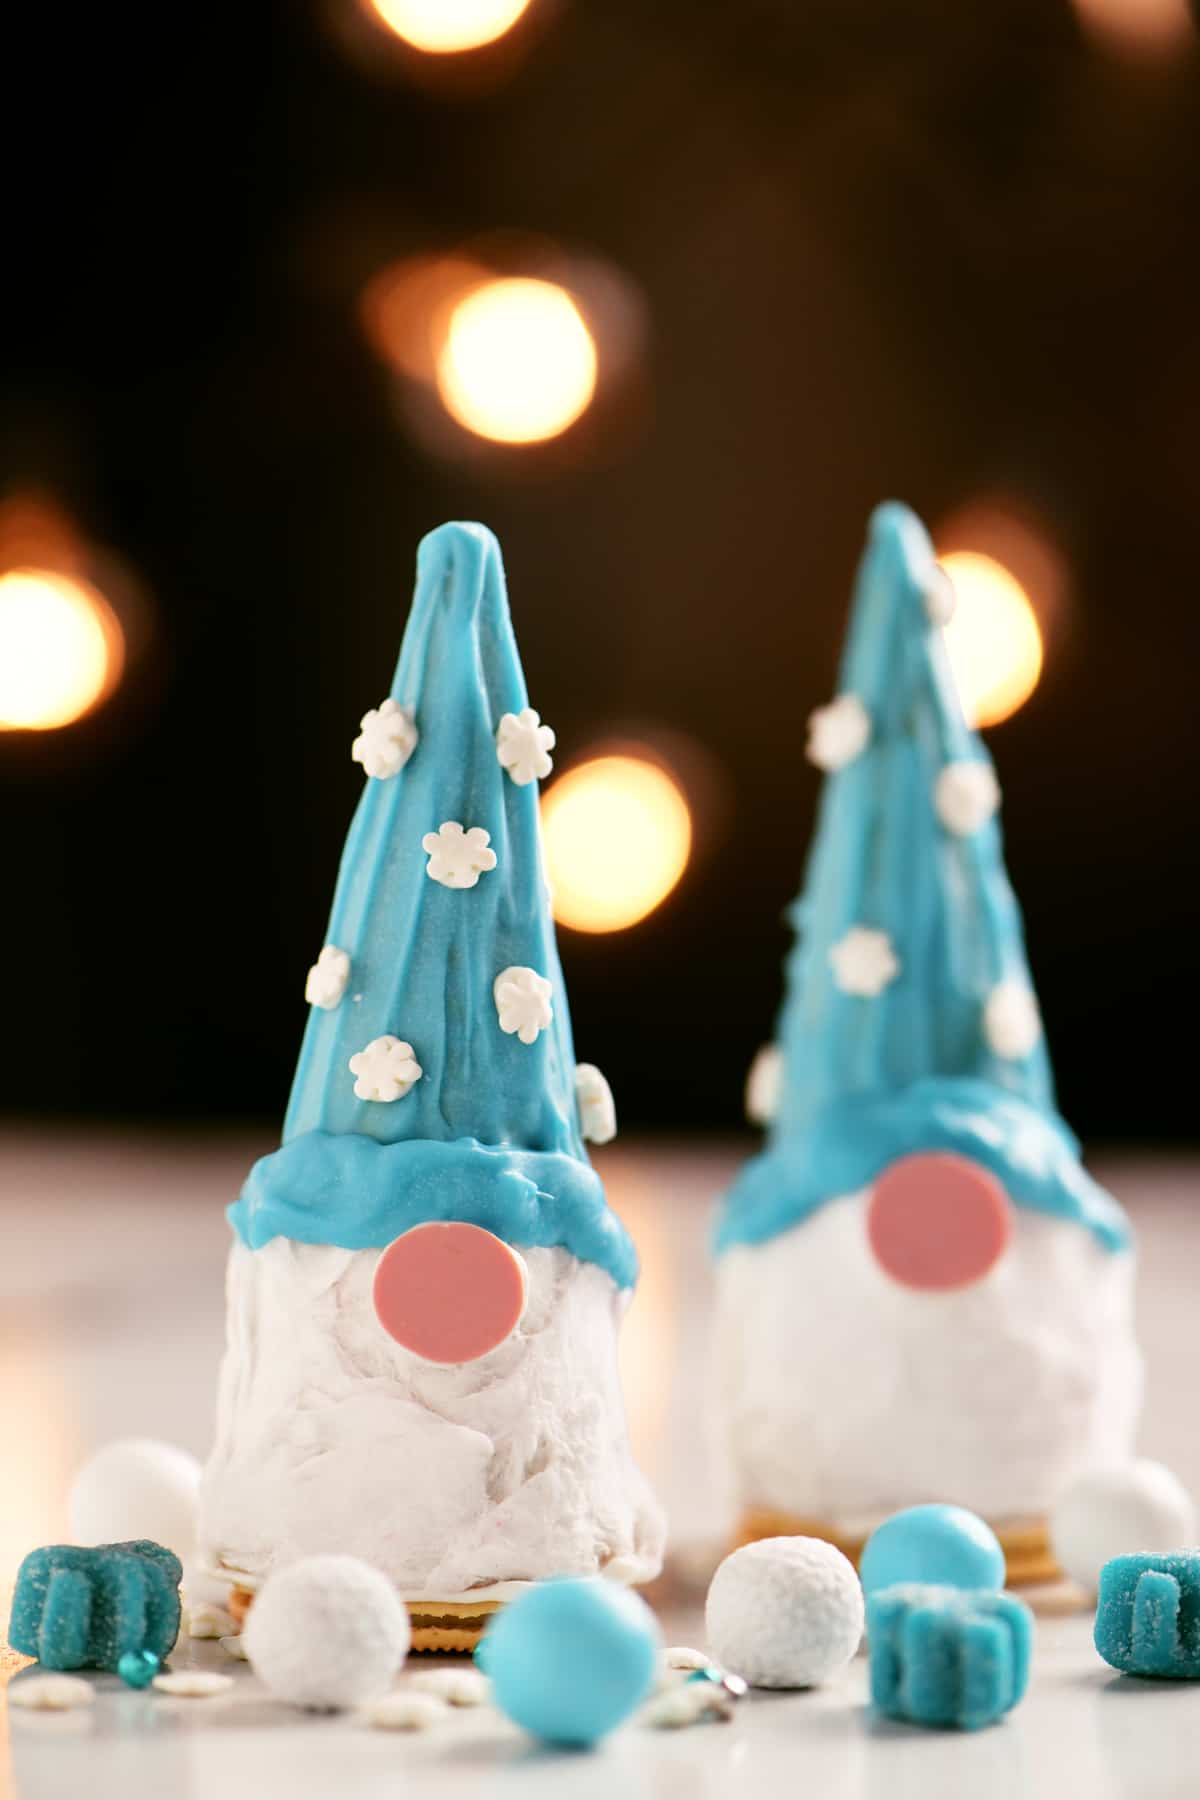
I love all of the little holiday gnomes, so of course, we had to make gnome cones. The cones are the perfect shape for tall, pointed gnome hats.
Gnome Cones Ingredients
For the Gnome Christmas Cones, we used ice cream cones, candy melts, sprinkles, cotton candy, and fillings!
- Ice Cream Cones: Sugar cones are perfect for these treats because the cones are pointy. If you want a flat hat, try using cake cones or use waffle cones to make a HUGE gnome.
- Candy Wafers: We used blue and white candy wafers to decorate the gnomes.
- Cotton Candy: To make the gnome’s beards, we used cotton candy. You could also use marshmallows like we did when making the Santa cones.
- Sprinkles: We used snowflake sprinkles to decorate the hat and various sprinkles inside the cones.
- Candy: The gnomes are filled with blue and white candy and sprinkles of various kinds. A round pink candy is used to make a large nose. You can buy pink candies or make noses like I did for my gnome cookies recipe.
- Cookies: The candy is held inside the Christmas cones by a golden Oreo thin cookie.
How To Make Gnome Christmas Cones
These Gnome Christmas Cones are so much fun to decorate with their big pink noses and cotton candy beards!

- Hat: Spread melted blue candy wafers over half of the cone to create the gnome hat. Then, attach snowflake sprinkles with melted white candy wafers.
- Beard: Attach pieces of white cotton candy and a pink nose with melted white
candy wafers. - Filling: Fill the Christmas cone with white and blue candy and sprinkles. Seal them inside by covering the opening with a cookie.
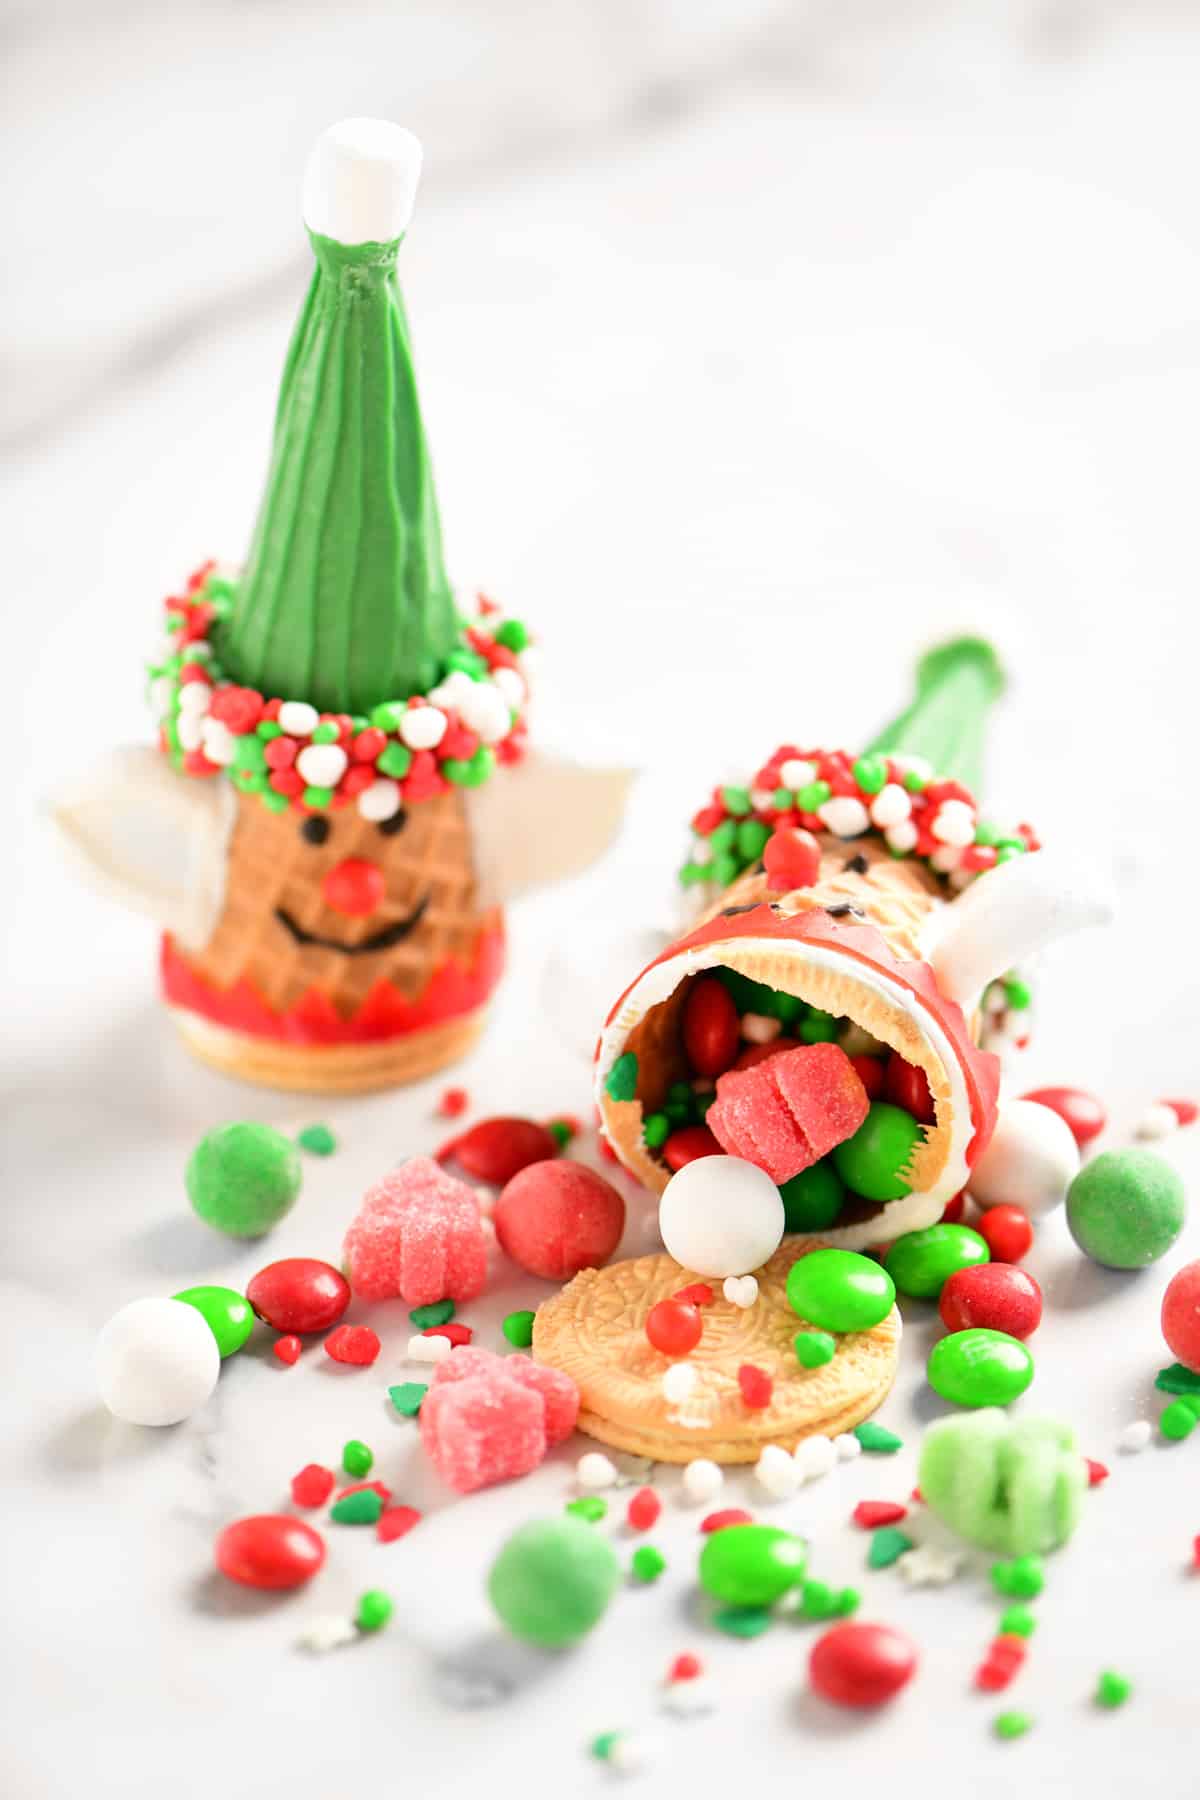
Christmas Elf Cones
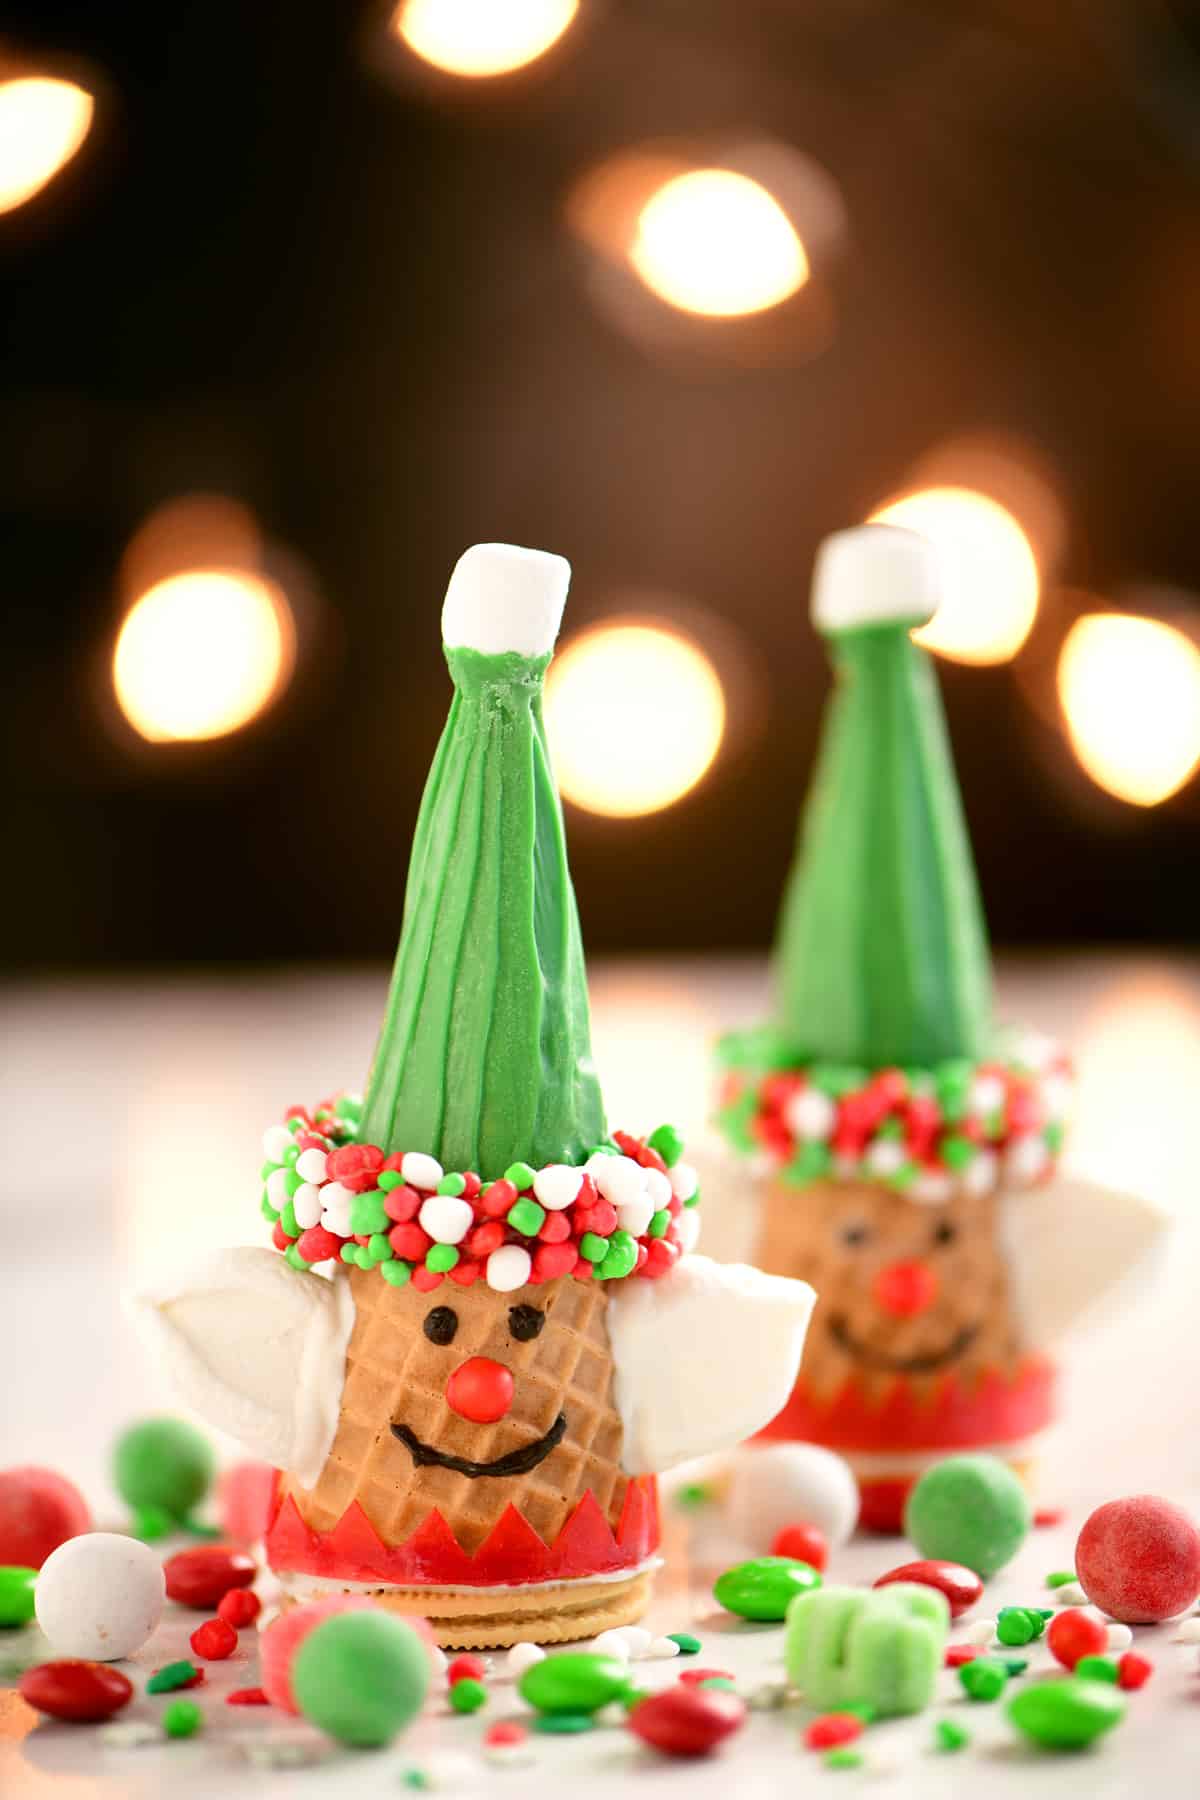
Where would Santa be without his elves? These Elf cones are so colorful and are sure to bring a smile to your face.
Elf Cone Ingredients
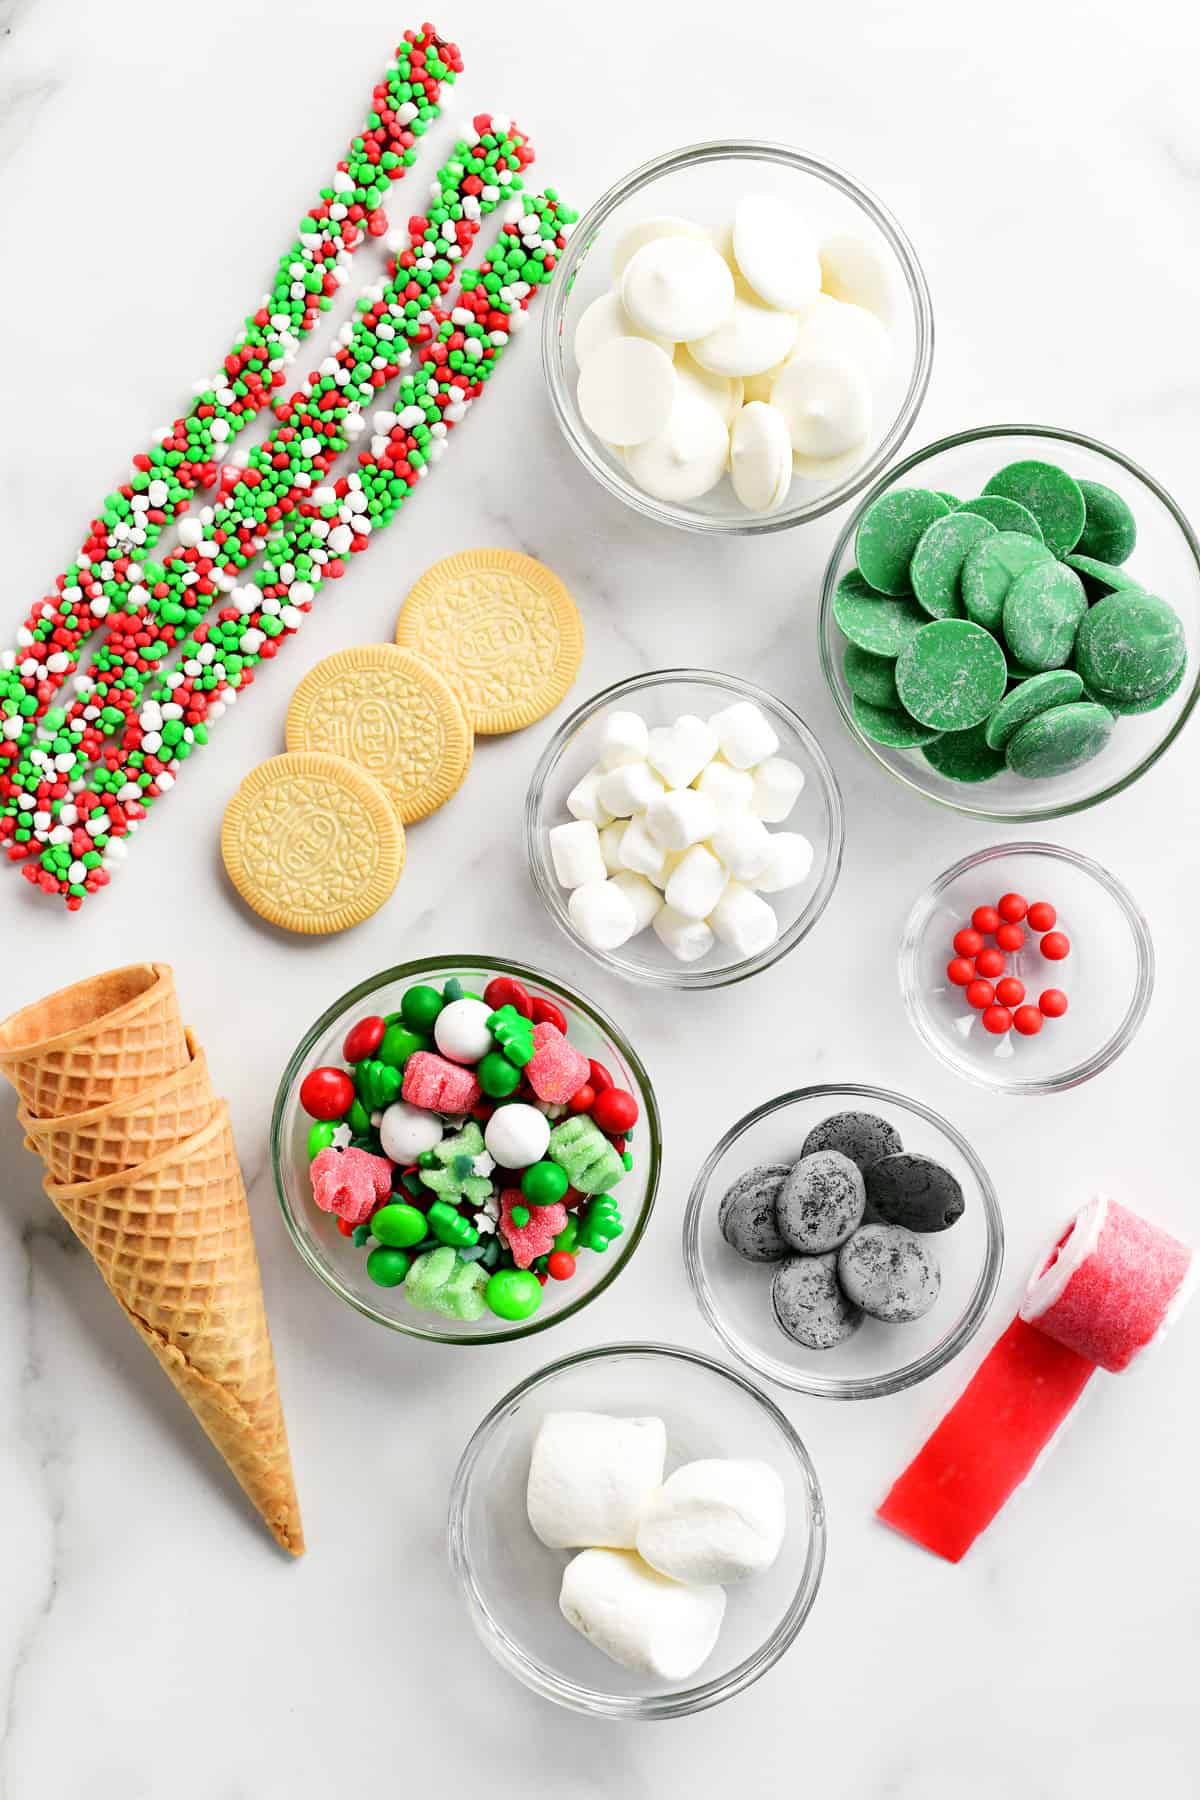
To make the Christmas elf cones, you’ll need sugar cones, candy wafers, decorations, and cookies.
- Ice Cream Cones: For this recipe, we used regular sugar cones because of the pointy tips. If you want to make a larger version, try using waffle cones. Or you could use cake cones if you want a flat hat.
- Candy Wafers: You’ll need red, green, white, and black candy wafers to make the elves. They are used for decorating and for attaching candy.
- Marshmallows: This recipe calls for two kinds of marshmallows: mini marshmallows and large marshmallows. The mini marshmallows go on the top of the hat. And the large marshmallow is used to make the elves’ ears.
- Candy: The candy is used for filling the elves as well as decorating the outsides of the Christmas cones.
- Cookies: We use golden Oreo thins to hold the candy inside the cones.
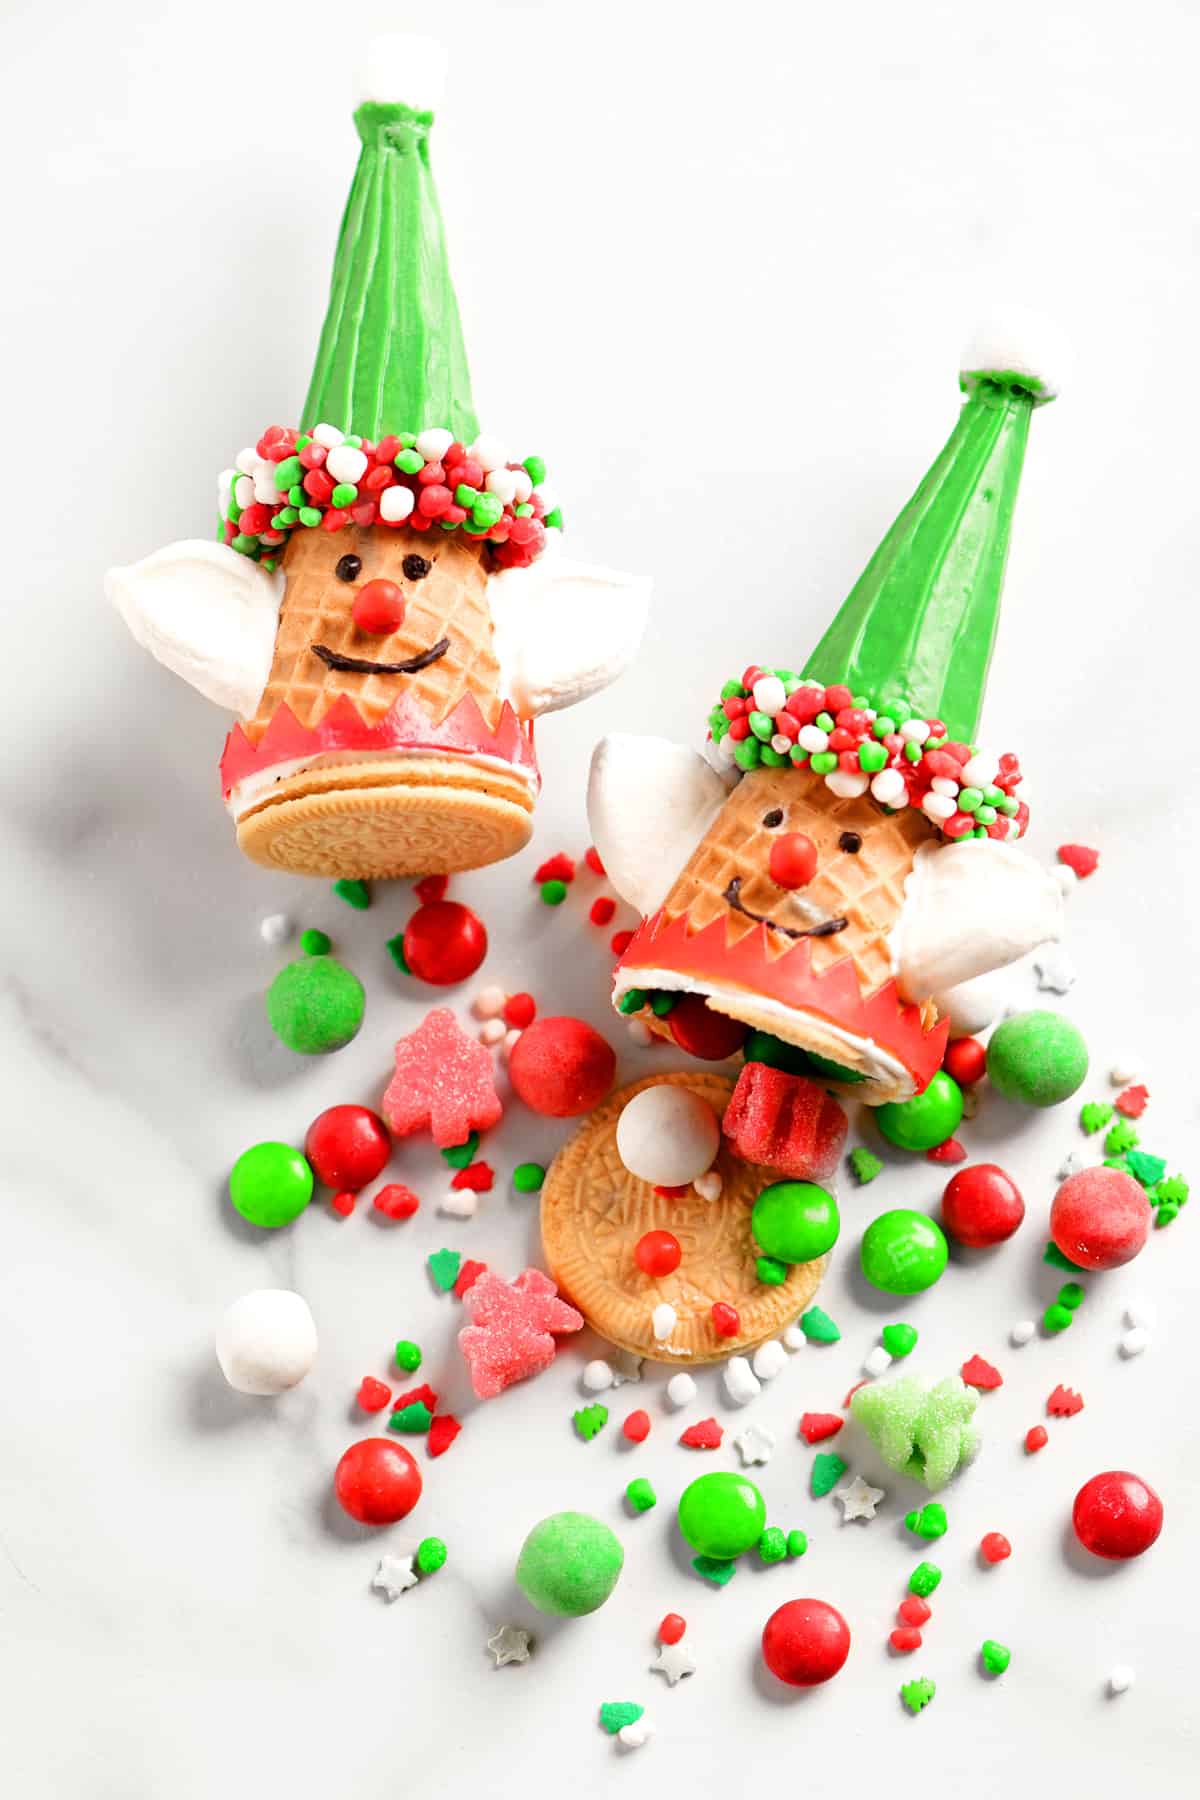
How To Make Elf Christmas Cones
Elf Christmas Cones are made with ice cream cones, mini marshmallows, Fruit-By-The-Foot, Nerd’s rope, and candy fillings!
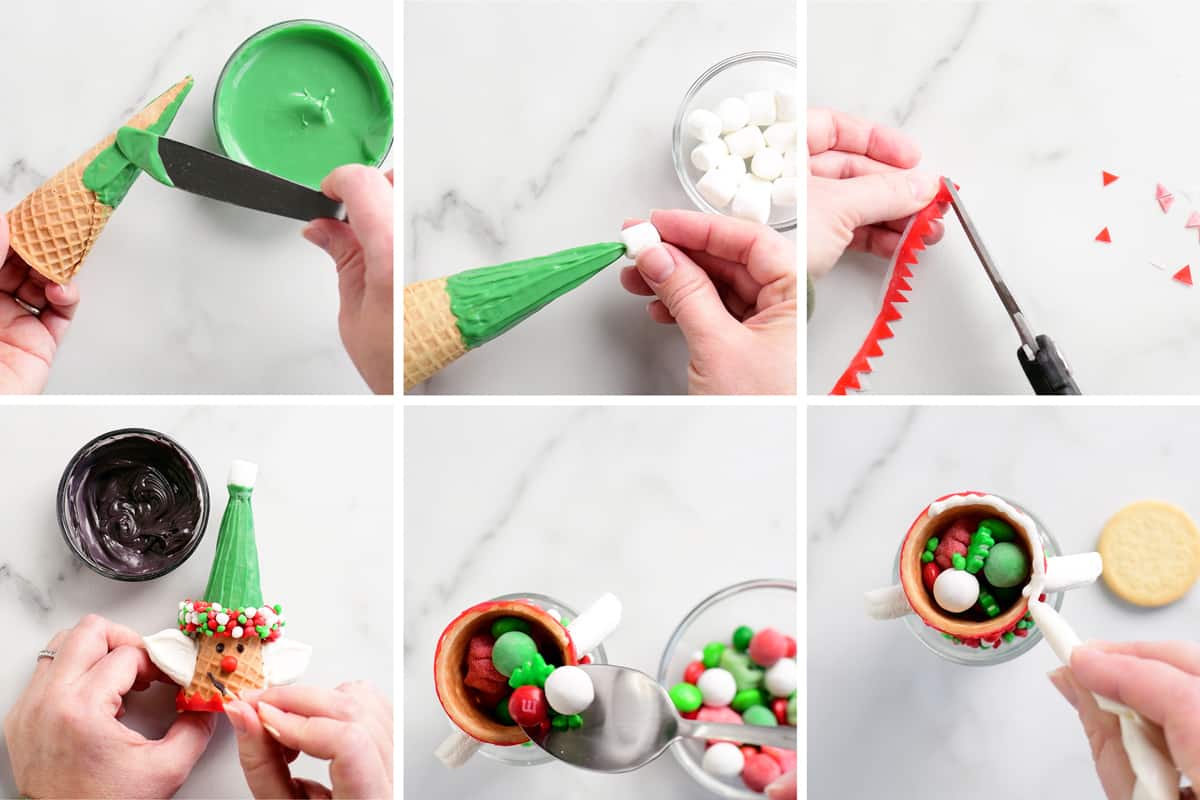
- Elf Hat: First, spread melted green candy wafers over half of the cone to make the hat. Then, attach a mini marshmallow to the point and use a Nerd’s rope to make the brim.
- Face: Make eyes and a mouth with melted black candy wafers and attach a red candy nose. Then, cut the large marshmallows with kitchen shears and attach them to the sides of the face for ears.
- Collar: Make a cheerful collar by cutting a red Fruit-By-The-Foot and attaching it to the bottom of the cone.
- Filling: Fill the Christmas cones with red, green, and white candies and sprinkles. Hold them inside by attaching a cookie over the opening.
Frequently Asked Questions
Yes, you can make them ahead of time and store them in an airtight container or bag.
Try making a snowman (the cake cones would work well when making Frosty the Snowman), reindeer, and Christmas trees.
Yes, you can use chocolate chips or baking chips instead of candy wafers, but there is a limited amount of available colors.
More Adorable Holiday Recipes
- Our Hot Chocolate Cookie Cups are a sensation!
- These Snowman Meringue Cookies will melt in your mouth.
- Mini Candy Houses are like mini gingerbread houses!
- Breakable Chocolate Gifts have treats inside.
Christmas Cones
Video
Equipment
Ingredients
Santa Cones
- 3 sugar cones
- ½ cup red candy wafers
- ½ cup white candy wafers
- ¼ cup mini marshmallows
- ¼ cup dehydrated marshmallow bits
- 6 eyeball sprinkles
- 3 round red candies
- ½ cup red and white candies
- 3 golden oreo thins
Gnome Cones
- 3 sugar cones
- ½ cup blue candy wafers
- ½ cup white candy wafers
- 1 cup white cotton candy
- 1 tablespoon snowflake sprinkles
- 3 round pink candies
- ½ cup blue and white candies
- 3 golden oreo thins
Elf Cones
- 3 sugar cones
- ½ cup green candy wafers
- ¼ cup white candy wafers
- ¼ cup black candy wafers
- ¼ cup red candy wafers
- 3 mini marshmallows
- 3 large marshmallows
- 3 round red candies
- ½ cup red green, and white candies
- 3 golden oreo thins
- 3 nerds ropes
- 1 red fruit by the foot
Instructions
Santa Cones
- Use melted red candy wafers to make the hat.
- Press a mini marshmallow onto the tip.
- Use the melted white candy wafers to create a rim around the hat and to attach the dehydrated marshmallows for the beard. Optional Step: Once the candy coating has hardened, pull the mini marshmallows around the brim off leaving a bumpy layer. Cover the bumpy layer with melted white candy wafers.
- Attach the eyeball sprinkles with white candy melts and the round red candy nose with red candy melts.
- Fill the cone with red and white candies.
- Use melted white candy wafers to attach golden oreo thin to the opening.
Gnome Cones
- Use melted blue candy wafers to make the hat.
- Spread melted white candy wafers on the bottom half of the cone and attach the cotton candy beard.
- Secure a pink nose in place with melted white candy wafers.
- Put melted blue candy wafers in a piping bag and make a hat rim over the edge of the cotton candy beard.
- Attach the snowflake sprinkles to the hat with white candy wafers.
- Invert the dried gnome cone in a glass. Fill the cone with blue and white candies.
- Use melted white candy wafers to attach golden oreo thin to the opening.
Elf Cones
- Spread the melted green candy wafers over half of the cone to make the hat.
- Press a mini marshmallow onto the tip.
- Use melted green candy wafers to attach the nerd rope as a hat rim.
- Cut the large marshmallows and attach them as ears with white candy wafers.
- Cut the fruit by the foot into a zigzag and attach using red candy wafers.
- Attach the round red candy nose with red candy melts. Use the black candy wafers to make eyes and a mouth.
- Invert the dried elf cone into a glass. Fill the cone with red, green, and white candies and sprinkles.
- Use melted white candy wafers to attach golden oreo thin to the opening.