• Home
  • About Me
  • Contact

The Gunny Sack

  • Dinner
  • Dessert
  • Slow Cooker
  • Recipe Index
    • All Recipes
    • Appetizer
    • Beverages
    • Breakfast
    • Crock Pot
    • Dessert
    • Dinner
    • Salad
    • Side
    • Soup
    • Snack
    • Holiday
  • Tutorials
    • All Tutorials
    • Mason Jars
    • Homemade Gifts
    • Party Ideas

Home » Recipes » Appetizer » Easy Pepperoni Rolls

Easy Pepperoni Rolls

Pin
Share

This post may contain affiliate links to products. If you use those links, I may earn a commission. As an Amazon Associate I earn from qualifying purchases. Learn more here.

Jump to Recipe

Easy pepperoni rolls are a great appetizer! Whether you make these pizza balls with biscuits, bread dough, or crescent rolls they are sure to be a family favorite. Moms like them because they are easy to make and kids will like them because they are bite-sized pizzas!

collage of photos showing steps for making pizza balls

Every time I make Easy Pepperoni Rolls I get rave reviews They are super easy to make and are a great snack or appetizer. These pizza balls are Pillsbury biscuits filled with pepperoni and cheese.

Disclaimer: This post contains links to products for making this recipe. If you use those links, I may earn a commission. Learn more here.

How To Make Easy Pepperoni Rolls

ingredients for making pizza balls

Step One:

Gather the following ingredients: 3 cans Pillsbury Buttermilk Biscuits (10 biscuits per can), pepperoni slices, Colby & Monterey Jack cheese, eggs, grated Parmesan cheese, Italian seasoning, garlic powder and pizza sauce.

Cheese for Pizza Balls

Step Two:

Cut the block of Colby & Monterey Jack cheese into at least 28 squares.

slices of pepperoni and cube of cheese on dough

Step Three:

Flatten a biscuit into a circle. Stack a slice of pepperoni, a cube of cheese, and a second slice of pepperoni on top of the dough circle.

wrapping dough around the ingredients

Step Four:

Gather up the edges of the biscuit around the stack of pepperoni slices and cheese cube.

pizza ball dough bundle

Step Five:

Pinch the dough together and now you have a cute little bundle.

pepperoni pizza rolls in a pan

Step Six:

Continue until there are 28 pepperoni rolls.

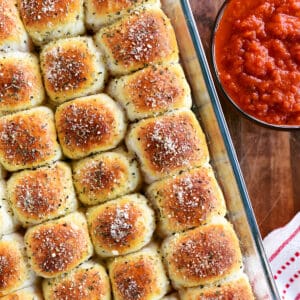
Line the pepperoni rolls up (seam side down) in a greased 9×13 in. pan.

Brush with beaten egg.  Sprinkle with grated Parmesan cheese, Italian seasoning, and garlic powder.

Bake at 375°F for 18-20 minutes, until golden brown.

baked pepperoni rolls in pan

Step Seven:

Serve the rolls with warm pizza sauce for dipping.

Easy Pepperoni Rolls Frequently Asked Questions

1. Can these easy pepperoni rolls be frozen and reheated?

Yes! Follow all of the steps and fully bake the pepperoni rolls. Allow them to cool completely and then freeze them in an air-tight container. To reheat the pepperoni rolls, bake them in the oven at 350°F for 10-15 minutes.

2. Can easy pepperoni rolls be prepared ahead of time and baked before serving? Possibly. Pillsbury dough is formulated to be baked right after you open the tube of dough. For the best possible results, use bread dough instead of Pillsbury dough to prepare the pepperoni rolls ahead of time.

3. If I can’t purchase Pillsbury biscuits, what can I use instead? Bread dough is a great alternative to Pillsbury biscuits. An easy option is Rhodes frozen bread dough. Follow the directions on the package for thawing the dough so that it is ready when you want to make the pepperoni rolls. Another option is to use crescent roll dough.

4. Can I use Pillsbury Grands biscuits instead? Yes! Cut the biscuits in half before flattening them since they are bigger in size.

5. Is the egg wash necessary? The egg wash helps the toppings stick and tops of the pepperoni rolls brown. They can be made without it if preferred.

6. Can other cheeses be used? Definitely! Use whichever cheese you prefer. You can even use shredded cheese, cheese sticks or string cheese.

7. What about other toppings and fillings? These pepperoni rolls can easily be turned into anything you want! I’ve made sausage pizza balls, mac ‘n cheese balls, bacon cheeseburger pizza balls, cheese bombs, and taco bites.

Continue to Content
easy pepperoni pizza rolls photo collage of steps

Easy Pepperoni Rolls

Yield: 28
Prep Time: 15 minutes
Cook Time: 20 minutes
Total Time: 35 minutes

Easy pepperoni rolls are a great appetizer! Whether you make these pizza balls with biscuits, bread dough, or crescent rolls they are sure to be a family favorite.

Ingredients

  • 3 cans Pillsbury Buttermilk Biscuits (use 28 biscuits), 10 biscuits per can
  • 56 pepperoni slices
  • 8 oz Colby & Monterey Jack cheese
  • 1 egg, beaten
  • 2 tbsp grated parmesan cheese
  • 1 tsp Italian seasoning
  • 1/2 tsp garlic powder
  • 15 oz jar pizza sauce

Instructions

  1. Cut the block of cheese into at least 28 squares.
  2. Flatten a biscuit into a circle. Stack a slice of pepperoni, a cube of cheese, and a second slice of pepperoni on top of the dough circle.
  3. Gather up the edges of the biscuit around the stack of pepperoni slices and cheese cube.
  4. Pinch the dough together and now you have a cute little bundle.
  5. Continue until there are 28 pepperoni rolls. Line the rolls up (seam side down) in a greased 9×13 inch pan.
  6. Brush with beaten egg.
  7. Sprinkle with grated Parmesan cheese, Italian seasoning, and garlic powder.
  8. Bake at 375°F for 18-20 minutes.
  9. Serve the pepperoni rolls with warm pizza sauce for dipping.

Notes

This recipe is adapted from one I received from my sister Tracy and is similar to Pizza Biscuit Wreath.

Nutrition Information:
Yield: 28 Serving Size: 1 grams
Amount Per Serving: Calories: 109Total Fat: 5gSaturated Fat: 2gUnsaturated Fat: 0gCholesterol: 18mgSodium: 386mgCarbohydrates: 10gSugar: 1gProtein: 4g
© The Gunny Sack
Cuisine: American / Category: Appetizer
Pin
Share
« Leather and Felted Wool Hydrangea Hair Elastics
Tiny Treasures Portable Game Tutorial »

Comments

  1. Silvia Baggins says

    December 29, 2014 at 6:48 pm

    I live in Brazil and we don’t have Pillsbury biscuits in here, is there any homemade recipe to replace them? I want to try these rolls, they seem delicious!

    Reply
    • Tonia says

      December 29, 2014 at 11:32 pm

      I would suggest using homemade bread dough. Best of luck! ~Tonia

      Reply
  2. jannette says

    December 18, 2014 at 11:39 am

    I just wanted to tell you that this recipe is just amazing and so easy to make, my 13 year old boy learned how to make these yummy pizza rolls he said that they are way better than the frozen ones, he also said he will never eat the frozen ones again. It makes me feel good that he can just whip these up and throw them in the oven as an after school snack.
    Thank you!!

    Reply
  3. Sasha says

    December 12, 2014 at 7:05 pm

    I just wanted to stop by and let you know that, over 1 1/2 years after you posted this recipe, it is STILL a huge favorite in our household! I’m about to make them right now, as a matter of fact… Just wanted to say thanks for such an easy and delicious recipe that has served us so well, and that is sure to continue to do so for a long time to come.

    Reply
    • Tonia says

      December 12, 2014 at 9:06 pm

      Thanks so much for stopping back to let me know! I love hearing that! Have a wonderful weekend. ~Tonia

      Reply
      • Sabrina says

        March 21, 2015 at 7:20 pm

        Making them now, they look delicious!! Thanks for the recipe.

        Reply
  4. Tina says

    October 12, 2014 at 6:04 pm

    These sound, I am going to try them for a sleep over at the church,for the kids.

    Reply
  5. Megan D. says

    October 4, 2014 at 9:15 pm

    I dont usually comment on recipes but i HAD to for this one!! Just made these for my husband’s birthday. i didn’t use the canned dough (just bc i didnt want to go buy some lol) i used this recipe http://www.tasteofhome.com/recipes/italian-herb-bread and made the dough in my bread machine for a no hassle dinner! the dough only made 18 but with just the 3 of us we didn’t need 28. I also brushed them with garlic butter after baking instead of the egg wash before. i will be making these at least once a month from now on!!! very very nummy!!!!!!!

    Reply
  6. nora says

    September 14, 2014 at 7:46 am

    I tried these last night for a get together….HUGE hit even though I forgot to put the toppings on. I made 80 of them and found that the timing was too long….I did flip the pan midway through but maybe it was because I used a dark baking pan instead of a glass one that the timing seemed too long? At any rate, they’re a staple in our house now/

    Reply
  7. Ann says

    May 16, 2014 at 9:05 am

    Love this recipe! Very quick and easy. I use string mozzarella cheese and cut into 4ths and would roll out the pizza dough as fatten out as muchas possible then cUT a nice square and place 2-3 pepperoni then a piece of cheese and stretch and roll into a ball. Makes for it to be less doughy . I also used butter and seasoning as the topping before baking. It passed my 1 1/2 year old and my brother who is a crazy about pizza loves them. In fact he request me to make a bunch of these for his wedding; so that’s gotta tell u something right there.

    Reply
    • Tonia says

      May 19, 2014 at 9:03 am

      Thanks Ann! That is great!

      Reply
  8. April says

    March 29, 2014 at 11:17 am

    Super yummy! I used mozarella cheese an doubled the amount of pepperon for our liking. Great recipe! Easily frozen an reheated later! Great snack an for lunch boxes. Thanks for the recipe!

    Reply
  9. Joanne says

    March 1, 2014 at 7:17 pm

    These were a big hit at my twin granddaughters’ 8th birthday party. Very good and super easy! I will definitely make them again! Thanks for a winner!

    Reply
  10. Mandy says

    December 22, 2013 at 11:05 am

    Just put these in the oven for lunch. They look so good. Yum!

    Reply
  11. Suzy says

    November 13, 2013 at 10:50 am

    …saw-clicked-read-so glad I did! Thanks Tonia, needed a quick go too for visiting family during this seasonal menu planning time-this will be great to nibble on after the Turkey Trot(5K) here in OK. for a breakfast/brunch kinda thing–can be made to ones liking = ) May your Thanksgiving be filled with flowing Blessings…

    Reply
  12. Tara Lee says

    October 20, 2013 at 4:22 pm

    Made a batch today, we ate them, I looked at my husband said “another round” he said “of course!” These are on the quick dinner list we loved them.

    Reply
  13. Jessica says

    October 17, 2013 at 3:09 pm

    would like to make theses but adjust such as putting some pizza sauce inside with the chz and pepp. how different do u think they would be and how should I adjust the cooking time?

    Reply
    • Tonia says

      October 17, 2013 at 4:04 pm

      I think the cooking time would be the same. Best of luck!

      Reply
    • Karen says

      March 21, 2015 at 1:04 pm

      I did this! I found that the cooking time was MUCH longer, actually. These were delicious, but the dough took forever because of the extra moisture from the sauce. Next time, I will bake for 15 minutes uncovered, then cover and bake for 15-20 minutes more. They’re perfect for my toddler daughter to “help” make, so I don’t mind the extra baking time, and the sauce added a nice kick.

      Reply
  14. jeanette says

    October 7, 2013 at 2:28 pm

    I just made a batch of them. And i ruined them. First time making them to. 🙁 i put to much spices on them. Otherwise i had lots of fun making them. 🙂

    Reply
  15. Vivian says

    October 5, 2013 at 10:18 am

    Thank you for this idea. First time I tries them I was so excited I didn’t read the directions and didn’t flip upside down . Lol thought what the heck.. Mine look so funny. Still tasted great ! Since I have tried other things in them like bacon, cream cheese hamburger w green pepper !

    Reply
    • Tonia says

      October 5, 2013 at 10:53 am

      LOL! That is great! I’m glad they turned out anyway. I will have to try a cream cheese one! Sounds delicious. Thanks Vivian!

      Reply
  16. colley says

    August 31, 2013 at 11:46 am

    i make these all the time and my recipe is much better simple and cheap you get cheese sticks pepporoni and cressont rolls then roll them together bake them at 350 and they stuff you up!

    Reply
    • Tonia says

      September 3, 2013 at 12:06 pm

      Thanks for the tips Colley!

      Reply
  17. Danielle says

    August 10, 2013 at 9:20 am

    Can you use any kind of cheese for this?

    Reply
    • Tonia says

      August 10, 2013 at 10:23 am

      Hi Danielle,
      Yes, you can use whatever cheese you want!
      ~Tonia

      Reply
  18. Sadie says

    July 12, 2013 at 4:14 pm

    Ok this my be a silly question but when freezing do you cook them first or freeze uncooked?

    Reply
    • Tonia says

      July 12, 2013 at 6:08 pm

      Hi Sadie! I would cook them first and then reheat them. The Pillsbury biscuit package says not to freeze the dough. Thanks for stopping by!

      Reply
  19. Maryellen says

    July 4, 2013 at 11:42 am

    Since you can make with either biscuit or crescent rolls, I’m wondering how it would work with homemade bun dough? Has anyone tried it?

    Reply
    • Tonia says

      July 7, 2013 at 9:24 am

      I’ve never tried it Maryellen but I would love hear how it works for you!

      Reply
  20. Eric says

    July 2, 2013 at 5:16 pm

    Make these and add chopped peppers and sometimes Italian sausage. They are yummy!

    Reply
  21. Sarah @ Miss Candiquik says

    June 18, 2013 at 9:19 am

    Great dinner idea!!! Pinning 🙂

    Reply
  22. Kayla says

    May 22, 2013 at 4:11 pm

    These are great with tomato paste in the inside rather than dipping them!

    Reply
  23. connie says

    May 22, 2013 at 10:28 am

    Can you make them with biscuts?

    Reply
    • Tonia says

      May 22, 2013 at 1:55 pm

      Hi Connie,
      I used premade refrigerator biscuits. Are you asking about making these with homemade biscuit dough? I have never tried it but if you do try it, I would love to hear what you experience was!
      ~Tonia

      Reply
  24. Rosanne says

    May 3, 2013 at 2:43 pm

    Tonia,

    Sorry, Courtney Luper is posting your photo and recipe on FB –
    https://www.facebook.com/just1courtney/photos?ref=ts

    For people who don’t realize this is copyright infringement and a big deal, here’s more on the topic –
    http://iambaker.net/what-every-facebook-user-needs-to-know/

    These are great, BTW, I made them for my grandson’s “Jake and the Never Land Pirates” 4th birthday party 3 weeks ago. 3 pans of them and they were demolished, I’d made a 4th pan and we had them for dinner. EVERYONE loves them. Thanks for sharing!! And I pinned them giving you credit 🙂

    Reply
    • Tonia says

      May 3, 2013 at 3:32 pm

      Thank you, Rosanne! I really appreciate you taking the time to tell me and I am delighted they turned out for you! That one Facebook post was shared 238,305 times to date. It makes me frustrated beyond words. When are people going to quit stealing photos and recipes and when is Facebook going to do something about it?

      Reply
      • Rosanne says

        May 3, 2013 at 4:08 pm

        You’re welcome! And that’s just it, when is Facebook going to to something about it? I think bloggers should ban together, hire a copyright attorney or firm, and go for it to make a statement. Ignorance of the law is no excuse as some claim, we’re ALL accountable to abide by the law.

        Reply
  25. Autumn B says

    April 10, 2013 at 8:35 pm

    Your photo is gone and I reworded the recipe but I will not remove it. I’m sorry that I used your photo but you cannot put claim to the recipe and except someone not to share it with their friends if your sharing it public 1st.
    It was posted almost a year ago, at the beginning of my blogging experience and I wasn’t aware of all the rules then. To be truthful, I was in the process of fixing the post when I saw your comment. I had already added a reference to you and then I noticed what you wrote. My post is been linked to your site.

    http://faerieflysavingsmomma.blogspot.com/2012/08/pizza-balls.html

    Thanks for posting this awesome recipe.

    Reply
    • Tonia says

      April 11, 2013 at 12:32 am

      Hi Autumn! Thank you for responding to my request and for taking the time to let me know that the photo has been removed. Here’s a great post about recipe copyrighting and attribution if you have any questions. http://ancestralchef.com/recipe-copyright/#sthash.5YoCG1tP.dpbs

      Reply
  26. Kathy says

    April 10, 2013 at 3:03 pm

    My daughter makes these by the tons. She brushes them with melted butter instead of the egg and after they have cooled, she freezes them. When they have company or the kids want a snack, she pulls em out and pops some in the microwave. They love em and it works for her family great!!

    Reply
    • Tonia says

      April 10, 2013 at 4:21 pm

      Sounds delicious! I will have to try using butter next time.

      Reply
  27. Dianne says

    March 30, 2013 at 12:54 am

    I couldn’t have found this recipe at a better time! I volunteer with a dog rescue group, and tomorrow I have folks meeting at my house to drop off and pick up a dog that’s moving from foster care into her forever home. As it’s a three hour drive (one way) for both parties, I wanted to be able to offer them some kind of snack, either to eat here, or take on the road. These will be perfect! Of course, I’ll have to make extras, as I suspect my husband will be snitching a few before my foster and adoptive families get here. 🙂 Thank you so much for sharing!

    Reply
    • Tonia says

      March 30, 2013 at 5:14 pm

      Wonderful! Thanks for sharing your story Dianne and I hope they are a huge hit!

      Reply
  28. Chenee says

    March 28, 2013 at 2:13 pm

    Hi Tonia, this looks so delicious! I live in Europe and we don’t have Buttermilk biscuits here. Is there a substitute I could use? Would crescent roll dough work? Or maybe pizza dough?

    Reply
    • Tonia says

      March 28, 2013 at 9:25 pm

      Hi Chenee, I would think that either one would work. I am partial to crescent rolls so I would love to hear how they work with them. If you decide to try it out, stop back and let us know how they turned out!

      Reply
  29. Sherry says

    March 26, 2013 at 6:05 pm

    I can’t wait to try these! Thank you so much for the recipe.

    Reply
  30. Karen says

    March 26, 2013 at 7:49 am

    Your recipe and picture are being shared with no credit to you:( https://www.facebook.com/photo.php?fbid=10151492759425266&set=a.10151360195390266.518636.698670265&type=1&theater

    Reply
« Older Comments
Newer Comments »

Leave a Reply Cancel reply

You have to agree to the comment policy.

Tonia LarsonHi, I'm Tonia, a lover of food and photography! Fill a gunny sack with ingredients, tie on an apron and let's get cooking!
  • Facebook
  • Instagram
  • Pinterest
  • Twitter
sign up for emails button
Disclosure | Privacy Policy | Nutrition Disclaimer

Categories

Blog Archives

Copyright © 2021 · Tasteful theme by Restored 316

Copyright © 2021 ·Tasteful Theme · Genesis Framework by StudioPress · WordPress · Log in